


The Architecture of Handheld Illumination: Why Extension Bars Matter
Quick Summary & Key Recommendations For solo creators, extension bars are essential for mounting multiple lights and accessories without cluttering the camera cage.
- Prioritize Stability: Use the 1:2 Heuristic (5cm of bar length per 1kg of weight) to balance leverage against the rig's moment of inertia.
- Safety First: Transition from friction-based cold shoes to 1/4"-20 threaded mounts or 15mm rods to prevent equipment drops during dynamic movement.
- Material Choice: Aluminum is often superior for handheld use due to its higher resonant frequency, which helps avoid micro-jitters caused by walking.
- Efficiency: Adopting a Quick-Release (QR) system can save professional creators over 40 hours of setup time annually.
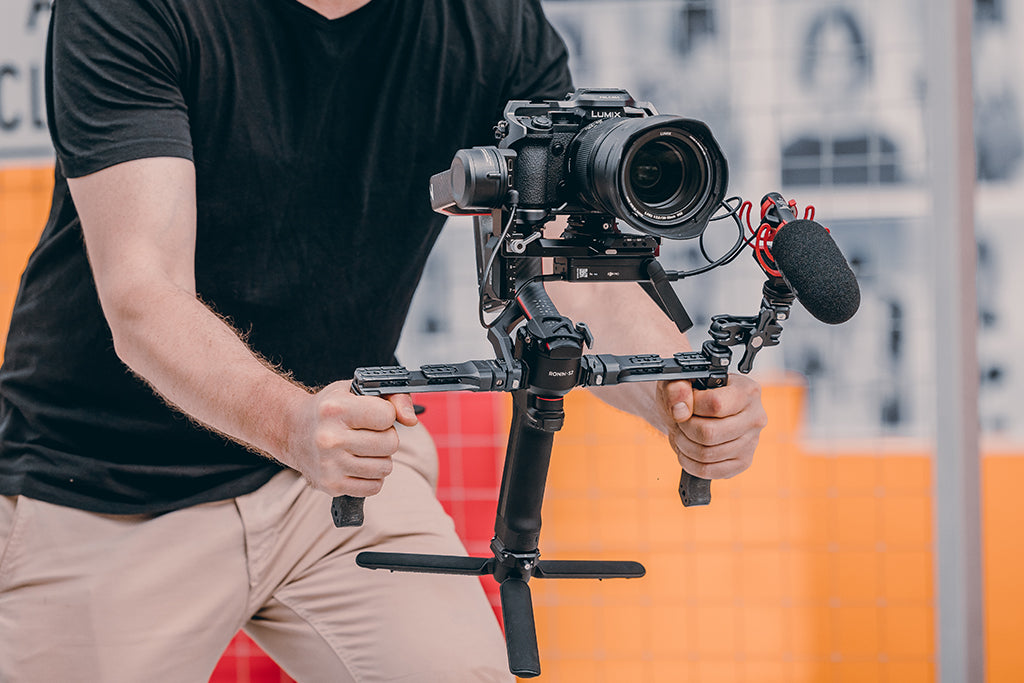
As solo creators, we often face a structural paradox. We need the sophisticated look of multi-point lighting, but we lack the crew to manage light stands. The solution usually involves mounting everything—camera, monitor, microphone, and multiple LED panels—directly onto a single handheld rig. However, this "all-in-one" approach quickly hits a physical ceiling. Standard camera cages and top handles offer limited real estate, leading to a cluttered, unbalanced mess that strains the wrists and compromises shot stability.
The extension bar acts as the modular infrastructure that solves this. It serves as a force multiplier for your rig's mounting points. But choosing the right bar isn't just about finding the longest piece of metal; it requires an understanding of biomechanics, material resonance, and the governance of technical interfaces.
The Biomechanics of the Rig: Understanding Wrist Torque
The most common mistake in handheld rigging is focusing solely on total weight. In reality, the primary challenge to a steady shot is leverage. When you mount a light on the end of a long extension bar, you create a lever arm that amplifies the force exerted on your wrist.
The Wrist Torque Formula
To estimate the physical demand of your rig, use the basic calculation for Torque ($\tau$):
$$\tau = m \times g \times L$$
- $m$ (Mass): The weight of your light and mount (kg).
- $g$ (Gravity): Approximately $9.81 m/s^2$.
- $L$ (Lever Arm): The distance from the center of your grip to the light (meters).
Modeling Note (Scenario Analysis): Imagine a 2.8kg rig (camera + accessories) held so the center of mass is 0.35m from your wrist pivot. This generates approximately $9.61 N\cdot m$ of torque. Based on general ergonomic data for average adult grip strength (often referenced in anthropometric studies like those by Chaffin), such a load can represent an estimated 60-80% of the Maximum Voluntary Contraction (MVC). This high exertion level is why even "lightweight" rigs can cause rapid fatigue during extended handheld takes.
The "1:2 Rule" Heuristic
To maintain stability during pans and tilts without excessive fatigue, we suggest the 1:2 Rule for handheld setups:
- For every 1kg (2.2 lbs) of accessory weight, aim for at least 5cm (~2 inches) of supported bar length on each side of the central grip.
This heuristic is designed for standard LED panels and monitors. It ensures weight is distributed widely enough to increase the rig's Polar Moment of Inertia, making it more resistant to small, unintentional rotations ("the shakes"), while staying within manageable torque limits for the average operator.
Material Science: Aluminum vs. Carbon Fiber
There is a persistent myth that carbon fiber is always superior due to "vibration damping." However, a methodical analysis of handheld dynamics suggests a more nuanced reality based on Resonant Frequency Mismatch.
The Resonance Factor
Vibration damping is critical for tripod legs, but for a handheld rig, the primary vibration source is your gait (walking). Human walking frequencies typically fall between 1 and 3 Hz.
- Carbon Fiber: While lightweight, some carbon fiber bars may have a natural frequency that overlaps with low-frequency gait vibrations, depending on the weave density and tube wall thickness.
- Aluminum Alloy (6061/7075): Stiffer, denser aluminum bars often have a higher natural frequency. This makes them less likely to resonate with your walking motion, which can result in fewer micro-jitters in the final footage.
Thermal Considerations
Most high-performance quick-release plates follow the Arca-Swiss Dovetail Technical Dimensions (a standard for precision mounting) and are machined from Aluminum Alloy.
Aluminum acts as a thermal bridge. In extreme cold, an aluminum rig will conduct heat away from your camera body and batteries faster than carbon fiber.
- Pro Tip: If shooting in winter, attach your aluminum plates and bars to the camera indoors first. This allows the system to reach a stable temperature before the battery performance is impacted by the external cold.
Interface Governance: Cold Shoe vs. 1/4"-20 Threads
When selecting an extension bar, the interface choice is critical. While cold shoe bars are popular for their perceived "versatility," they are often the weakest link in a professional rig.
The Shear Load Problem
A cold shoe is a friction-fit interface. Its holding force is limited by the spring tension of the clamp. According to research on Shock & Impact Loads on Structures (which analyzes how structures fail under sudden force), dynamic cinematography—like a sudden whip pan—can generate horizontal shear forces that may exceed the static friction of a cold shoe.
For any light heavier than a small pocket LED, a 1/4"-20 thread connection (standardized by ISO 1222:2010) is the recommended minimum for safety.
| Interface Type | Primary Retention Mechanism | Ideal Use Case | Risk Factor |
|---|---|---|---|
| Cold Shoe | Friction / Spring Tension | Microphones, small monitors | Higher lateral torque failure risk |
| 1/4"-20 Thread | Mechanical Interlock | LED Panels, heavy monitors | Secure, but slower without QR |
| 15mm Rod Clamp | Circumferential Compression | Battery plates, heavy arrays | Most secure; requires dual-screws |
Logic Summary: Our preference for threaded or rod-based mounting over cold shoes is based on the mechanical principle that a threaded fastener can handle significantly higher shear loads than a friction interface. This is a "Safety-First" approach to rigging.
System Architecture: Power and Cable Management
A professional multi-light rig treats power distribution as a structural component. This is where 15mm rod-based extension systems outshine simple flat bars.
The V-Mount Counterweight
If running multiple lights, you likely need an external power source. Rather than hanging a battery off the side, use a 15mm rod-mounted V-lock plate as a foundational rear counterweight.
- By placing the heaviest component (the battery) at the rear or center, you move the Center of Gravity closer to your body.
- This centralizes the mass, making the rig feel more "planted" and easier to maneuver.
Cable Governance
Experienced shooters avoid using Velcro straps directly on mounts, as they can snag. Instead, we recommend:
- Silicone Bands: High-friction bands to keep cables tight against the extension bar.
- Dedicated Rod Clamps: Small clamps that mount directly to the 15mm rod to provide strain relief for HDMI and power cables.
- Safety Note: A dangling cable can create unwanted torque on your camera's port. Always use a cable clamp to provide a "dead-end" for tension before it reaches the camera.
The Workflow ROI: Why Quick Release Wins
As noted in the 2026 Ulanzi Creator Infrastructure Report (an internal analysis of industry trends), the shift toward "ready-to-shoot" toolchains is a major productivity driver. For a solo creator, time spent fiddling with screws is lost creative time.
The Efficiency Calculation (Example Estimate)
We can estimate the potential financial impact of moving from traditional threaded mounting to a quick-release (QR) system based on the following assumptions:
- Traditional Thread Mounting: ~40 seconds per accessory swap.
- Quick Release (e.g., F22 or F38 system): ~3 seconds per swap.
- Assumed Frequency: 60 accessory swaps per shoot day / 80 shoot days per year.
- Professional Rate: $120/hour.
ROI Estimate: Under these conditions, a QR-integrated system could save approximately 49 hours annually. This represents a potential value of ~$5,800+ in recovered time. While individual results vary based on shoot frequency and complexity, this calculation demonstrates how modular infrastructure pays for itself through improved workflow efficiency.
The Pre-Shoot Safety Checklist
Before you hit "record" on a multi-light setup, perform this 3-step audit:
- Audible: Do you hear a clear "Click" when engaging your quick-release mounts?
- Tactile: Perform the "Tug Test." Pull firmly on every light and accessory to ensure the locking pin is fully engaged.
- Visual: Check the locking indicators. Many professional systems use color-coded pins (e.g., orange or silver) to show when the lock is in the "Safe" position.
Summary: Building Your Infrastructure
Choosing the right extension bar is about building a stable, reliable foundation for your creative work. By applying the 1:2 Rule, prioritizing 1/4"-20 or rod-based interfaces, and integrating quick-release systems, you transform your rig from a source of frustration into a precision tool.
Investing in standardized components—like those adhering to ISO and Arca-Swiss standards—ensures your rig can grow with your career, rather than becoming obsolete with your next camera upgrade.
Disclaimer: This article is for informational purposes only. Rigging heavy camera equipment involves inherent risks. Always check the load ratings of your specific components and perform safety tests before use. Ulanzi is not responsible for equipment damage or injury resulting from improper rigging.
References
- ISO 1222:2010 Photography — Tripod Connections: The international standard for 1/4"-20 and 3/8"-16 mounting threads.
- The 2026 Creator Infrastructure Report: Ulanzi internal analysis of workflow efficiency and modular ecosystem trends.
- Shock & Impact Loads on Structures - Chalmers Research: Academic study on structural failure under dynamic loading, supporting the need for secure mechanical interlocks.
- Cold Shoe vs. 1/4" Threads: Light Mount Guide: A practical comparison of mounting security for LED lighting.
- Arca-Swiss Dovetail Technical Dimensions: A technical breakdown of the industry-standard quick-release geometry.


