


Executive Summary: The "Ready-to-Shoot" Setup
For creators moving from mirrorless cameras to heavy cinema rigs (3kg+), standard desktop arm weight ratings can be misleading. To reduce the risk of equipment damage and the "slow sag" often seen in high-leverage setups, we recommend the 60% Heuristic: as a practical rule of thumb, aim to limit your rig’s weight to approximately 60% of the arm's rated capacity when used at or near full extension.
Quick Decision Guide: Choosing Your Arm Support
Based on typical workshop observations and common rigging patterns.
| Rig Weight | Primary Extension | Recommended Arm Type | Desk Requirement |
|---|---|---|---|
| < 2kg (Vlog/Mirrorless) | Any | Standard Gas Spring | Standard Desk |
| 2kg – 4kg (Full Frame + Cage) | < 50% | Heavy-duty Gas Spring | Reinforced (Plate recommended) |
| 2kg – 4kg (Full Frame + Cage) | > 75% | Mechanical Counterbalance | Reinforced (Plate required) |
| > 4kg (Cinema Rigs) | Any | Professional Mechanical | Solid Wood / Steel Support |
1. The Physics of Stress: Beyond Static Weight
A frequent pattern observed in equipment audits and support feedback is the over-reliance on a manufacturer’s "Max Load" rating. These ratings often refer to a Vertical Static Load—a weight placed directly over the mounting point without the influence of leverage.
However, desktop arms are almost always used in a cantilevered position. When you extend an arm horizontally, you are managing torque (rotational force), which increases significantly with distance.
The Torque Model for Rigging
To estimate the stress on your mounting system, we use a fundamental physics calculation. These values are illustrative models based on a fully extended horizontal arm to determine "worst-case" stress scenarios.
Torque ($\tau$) = Mass ($m$) $\times$ Gravity ($g$) $\times$ Lever Arm ($L$)
| Rig Weight ($m$) | Extension ($L$) | Estimated Torque ($\tau$) | Practical Context |
|---|---|---|---|
| 1.5 kg (Mirrorless) | 0.5 m | ~7.4 N·m | Standard monitor arm load |
| 3.0 kg (Cinema) | 0.5 m | ~14.7 N·m | High stress; requires heavy-duty joints |
| 5.0 kg (Pro Rig) | 0.5 m | ~24.5 N·m | Approaches limits of most prosumer arms |
Calculation assumes standard gravity ($9.8 m/s^2$).
Technical Context: Modeling Assumptions These figures are derived from internal workshop observations and general engineering principles for safe setup, rather than mandated safety standards:
- Safe Working Load (SWL): Suggested at 50–60% of max rating to provide a buffer for dynamic movement.
- Surface Compression: 1.5–3.0mm (Typical range observed in 15mm particleboard desks under sustained 5kg loads).
- Joint Friction: 0.85 – 0.95 $\mu$ (Estimated coefficient for high-tension locking mechanical joints based on material friction tables).
In a 3kg rig scenario, constant tension can lead to "material creep" in the joints and the mounting surface. While a human might easily lift this weight, a mechanical joint must maintain this tension 24/7, which represents a significantly higher engineering hurdle.
2. The 60% Heuristic: Selecting the Right Capacity
When selecting an arm, we suggest a Safe Working Load (SWL) Heuristic. For any cantilevered arm, the operational weight of your rig should ideally not exceed 50-60% of the manufacturer’s rated capacity if you intend to use the arm at more than 75% of its maximum extension.
Why the Buffer is Recommended
- Off-Axis Moments: Heavy batteries or side handles create an off-axis weight distribution. This can twist the arm's joints, leading to "stiction"—a jerky movement caused by uneven friction.
- Dynamic Loads: Adjusting the camera height while mounted adds temporary force that can momentarily exceed static ratings.
- Long-term Fatigue: Constant tension at the limit can cause gas springs to gradually lose pressure or mechanical joints to smooth out over time, potentially leading to the "slow sag" seen in lower-rated setups.
3. Gas Spring vs. Mechanical Counterbalance
The choice between gas spring and mechanical systems often depends on your adjustment frequency. These observations are based on general mechanical wear patterns in studio environments.
- Gas Spring Arms: These offer the smoothest height adjustments. However, based on typical cylinder life cycles, they may experience performance degradation over several years if kept at their maximum tension limit. They are often best for creators who frequently reposition cameras during a shoot.
- Mechanical/Counterbalance Arms: These use heavy-duty springs or friction locks. While they can require more effort to adjust, they tend to offer high long-term stability for "set and forget" studio setups and are generally easier to maintain with basic lubrication.
4. The Foundation: Desk Integrity and Clamping Force
Even a high-performance arm can be limited by the mounting surface. Many modern "office" desks use a particleboard or honeycomb paper core which may not be designed for concentrated point loads.
Managing Surface Compression
A heavy rig on a narrow clamp creates high pressure. Over time, the clamp can slowly compress the internal material of the desk. This can create a microscopic gap, leading to "wobble." Users often try to fix this by over-tightening, which can strip threads or fracture the desk material.
Practical Solution: The Distribution Plate We highly recommend using a distribution plate—typically a sheet of 3mm steel or 10mm dense hardwood—between the clamp and the desk. This spreads the load across a larger surface area, reducing the risk of material compression. This is especially useful for C-Clamps vs. Weighted Bases where the footprint is minimized.
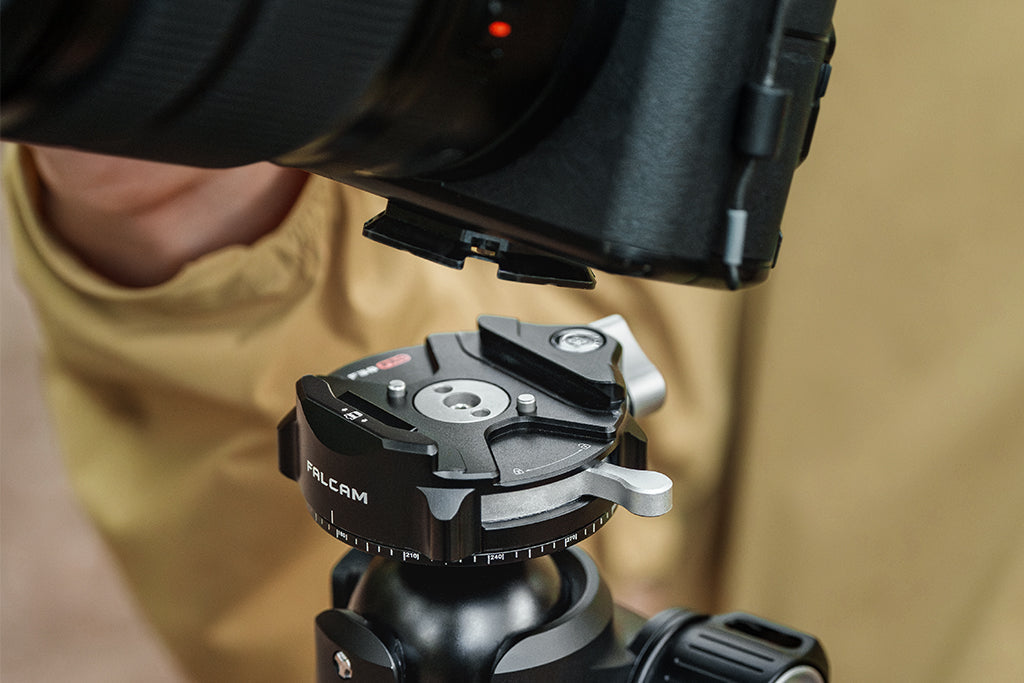
5. Interface Integrity: ISO Standards and Quick Release
The connection between your camera and the arm is a common point of mechanical stress. High-performance setups should adhere to established engineering standards to ensure interoperability.
ISO 1222:2010 Compliance
The ISO 1222:2010 Photography — Tripod Connections standard defines the 1/4"-20 and 3/8"-16 threads used in camera support. While these are the industry baseline, they are not always ideal for frequent swapping. Repeatedly threading a heavy camera onto an arm increases the risk of cross-threading.
Workflow Efficiency: Quick-Release Ecosystems
Transitioning to modular quick-release systems like FALCAM (F22, F38, and F50) can improve both safety and speed.
- Material Rigidity: These plates are typically machined from 6061 or 7075 Aluminum Alloy, providing the rigidity required for a secure interface.
- Load Nuance: While the F38 system is rated for an 80kg vertical static load (per manufacturer specs), we recommend the F50 system or F38 Anti-Deflection versions for cinema rigs exceeding 3kg to better handle dynamic lateral forces.
Workflow ROI (Example Scenario)
The following calculation is a hypothetical model to demonstrate potential time savings. Actual results vary significantly based on individual workflow frequency and professional rates.
The Efficiency Formula:
- Manual Swap Time: ~40 seconds
- Quick-Release Swap Time: ~3 seconds
- Time Saved per Swap: 37 seconds
Example Calculation: If a creator performs 60 swaps per shoot across 150 shoots per year:
- Total Time Saved: ~92 minutes per shoot $\times$ 150 shoots = ~230 hours/year.
- Estimated Value: At a professional rate of $50/hr, this represents a ~$11,500 value in recovered time.

6. Pre-Shoot Safety Checklist: The Professional Protocol
Reliability is built through consistent habits. We recommend this three-step verification process (The "ATC" Protocol) every time you mount your camera.
- Audible (A): Listen for a clear, metallic "Click" when engaging the quick-release plate.
- Tactile (T): Perform a "Tug Test." Apply moderate pressure in multiple directions to ensure there is no "play" or movement in the mount.
- Visual (C - Check): Verify the locking indicator. On FALCAM systems, ensure the safety pin is fully engaged and visible.
Cable Management
A heavy HDMI or SDI cable can act as a lever, creating unwanted torque on your camera's ports. Using cable clamps to provide strain relief ensures the weight of the cable is supported by the arm rather than the camera's internal electronics.
7. Long-Term Maintenance: Preventing "Stiction"
Joint maintenance is often overlooked. Over time, dust and friction can lead to "stiction"—where a joint sticks and then suddenly releases, causing the camera to jerk.
The Recommended Six-Month Service:
- Lubrication: Apply a single drop of lightweight synthetic lubricant to friction arm pivots if they become noisy or stiff.
- Fastener Check: Use a hex key to verify that mounting bolts are tightened to the manufacturer's suggested tension.
- Thermal Acclimation: In cold weather, if gear is brought from a vehicle into a warm studio, consider waiting 30 minutes before mounting. Aluminum plates can act as a thermal bridge; mounting a cold plate to a warm camera can occasionally cause condensation, which may affect grip.
Building a Stable Infrastructure
Choosing the right arm for a heavy desktop rig is about managing the Center of Gravity. By understanding the impact of torque, applying the 60% SWL heuristic, and reinforcing your mounting surface, you can transform your desk into a professional production console.
The goal is to eliminate the "friction of starting." When your infrastructure is reliable, you can spend less time checking clamps and more time creating. As the industry moves toward Spatial Optimization for Desktop Production Studios, stable interfaces remain the backbone of a professional creator's workflow.
Disclaimer: This article is for informational purposes only. Mounting heavy equipment involves inherent risks. Always consult the specific load ratings of your hardware and your desk manufacturer. If you are unsure about the structural integrity of your setup, consult a professional studio engineer. Improper mounting can lead to equipment damage or personal injury.
Sources
- ISO 1222:2010 Photography — Tripod Connections
- The 2026 Creator Infrastructure Report
- Eureka Ergonomic: Understanding Desk Load Capacity
- Manufacturer Specifications: FALCAM F38/F50 Load Rating Documentation.


