Creators usually get the best result from smart studio automation when they keep Ulanzi lights on the simpler app path and reserve Home Assistant or MQTT for the Smart Pixel Clock or other cross-device workflows. The tradeoff is simple: app control is easier to recover, while advanced automation is more flexible but adds setup friction.

What Scene Automation Needs
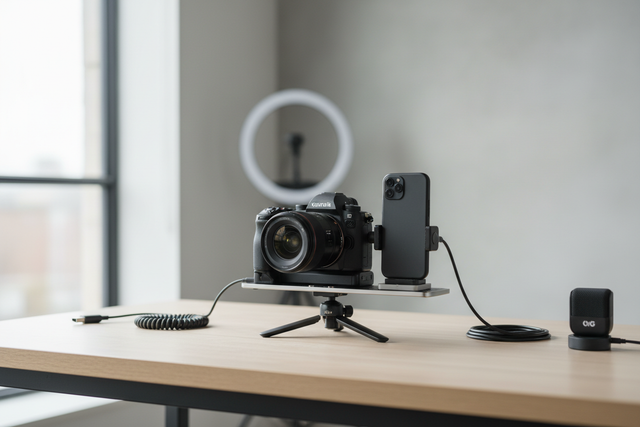
A stable creator workflow starts with three things: a controllable Ulanzi light, the Smart Pixel Clock, and one control layer that ties them together. For most desk setups, that control layer should be the Ulanzi Connect app first, because it is the conservative baseline for light control and grouping. The app is the safer default when you only need repeatable scenes, not a full smart-home stack.
The Smart Pixel Clock is the stronger candidate for advanced automation. Ulanzi's local automation path for the clock is tied to Awtrix 3, Wi-Fi, and MQTT, which means it can fit a more connected workflow without cloud dependence. That makes the clock a useful anchor for smart studio automation when you want visible status, notifications, or scene cues alongside your lights.

Check the setup in this order: power, network, firmware, then pairing. If you skip those basics, later scene issues are hard to diagnose because the failure can come from the device, the broker, or the scene logic itself. If the light only needs steady preset recall, keep it simple; if the setup has to talk to other devices, the advanced path starts to make sense.
Set Up the Control Chain
Start by putting every device on the intended network and giving each one a clear name. That sounds basic, but it keeps later automations readable. When you revisit a scene weeks later, a label like “call light” is easier to manage than a generic device name.
Next, pair the Smart Pixel Clock through its normal app flow before adding any automation layer. The Ulanzi Smart Pixel Clock Awtrix 3 setup shows the clock's community-supported path through Awtrix 3, MQTT, and Home Assistant. That is useful because it gives you a real automation branch for the clock without implying that every Ulanzi light works the same way.
For the lighting side, keep Ulanzi lights in the app-based control flow unless you have verified a device-specific third-party route. The official Ulanzi Connect app is the clearest baseline for how Ulanzi expects users to manage scenes, grouping, and everyday control. If you are building around the Smart Pixel Clock, that app-first baseline keeps the lights from becoming the weak link in a more advanced stack.
If you want MQTT in the mix, treat it as an optional layer, not the starting point. AWTRIX 3 documentation shows MQTT and HTTP APIs for custom apps and notifications, so it can be part of a local automation system, but the protocol setup should be matched to your exact device and firmware combination. In other words, do not assume that a working broker equals a working scene.
A practical setup sequence looks like this:
- Confirm power and Wi-Fi stability on the light and clock.
- Update firmware and app versions before pairing.
- Pair the clock in its normal app flow first.
- Test one manual trigger before you write automation rules.
- Only then add MQTT, Home Assistant, or other third-party logic.
That order keeps the stack testable. If something fails, you know whether the issue is in pairing, in the network, or in the automation layer.
Design Creator Scenes That Repeat
A useful scene library is small. Most creators do not need ten presets; they need three or four that always do the same job. The most repeatable setup is usually a short list built around stream start, call mode, recording mode, and a fallback neutral look.
- Stream start: warm up the key light, turn on the clock status, and keep the background simple.
- Call mode: use softer brightness and a clean color temperature so the face reads well on camera.
- Recording mode: lock the key settings before you open the editor or camera app.
- Away or pause mode: drop light output and use the clock as a quick status cue.
- Reset mode: return everything to one known baseline so the next session starts cleanly.
This is where multi-point modular rigs help as a planning idea. If you split a workspace into functional roles instead of random devices, each preset is easier to remember and less likely to break when you adjust one piece.
Keep brightness, color, and timing consistent within each scene. That does not mean every preset has to look identical. It means a scene should behave the same way each time you call it up, so you are not re-tuning the workspace before every meeting or recording.
If your setup uses more than one light, group them only after the base device works on its own. The goal is not to make the scene clever. The goal is to make it repeatable enough that you do not hesitate before a live call or stream.
Compare Control Options
The choice usually comes down to how much setup friction you are willing to absorb in exchange for more flexible scene control. App-only control is the easiest place to stay. Home Assistant-style automation is the better fit when you need cross-device triggers or smart-home logic. Controller-assisted workflows sit in the middle when you want faster access without changing the whole automation model.
| Control Path | Best For | Setup Friction | Troubleshooting Burden |
|---|---|---|---|
| App-only | Simple repeatable light presets | Low | Low |
| Controller-assisted | Faster access and macro-style control | Moderate | Moderate |
| Home Assistant automation | Cross-device scenes and local logic | Higher | Higher |
| Grouped multi-light scenes | Consistent looks across several fixtures | Moderate to high | Moderate to high |
For a small creator workspace, this is the key rule: if your main need is scene recall, stay in the app. If your main need is orchestration, use Home Assistant or MQTT only where the exact device path is documented. The Ulanzi TC001 has that stronger automation story; many Ulanzi lights do not have the same level of third-party proof.
Troubleshoot Scene Failures
When scenes miss triggers or stop responding, check power and network first. Those are the fastest failure points to rule out, and they are also the easiest to overlook when you are rushing before a live session. If the device reconnects but the scene still fails, the issue is probably in pairing, discovery, or scene logic rather than the light itself.
The most common advanced-path friction shows up in MQTT discovery and notification behavior. In the Home Assistant MQTT discovery docs, discovery is enabled by default, but device setup still depends on the topic structure and payload the device publishes. That does not prove a universal flaw, but it does confirm that broker setup and discovery settings can matter as much as the device.
Use this recovery order:
- Recheck power and Wi-Fi.
- Confirm the broker and discovery settings.
- Re-pair the device if triggers have drifted.
- Simplify the scene to one action.
- Add variables back one at a time.
If grouped lights start behaving inconsistently, break the group apart and test the base device alone first. That matches the logic in grouping multiple lights: grouping works best after each fixture is already stable on its own.
Treat color-temperature drift as a separate issue, especially on higher-output LEDs. If the scene looks different from session to session, do not assume the trigger is at fault. Sometimes the real problem is that brightness, timing, or color has stacked up over multiple changes instead of resetting cleanly.
Build Your Next-Step Checklist
Before you rely on smart studio automation in a live stream or recording, do one dry run from start to finish. Confirm the light powers on, the clock is visible, the network is stable, and the scene names still make sense to you. Then test the manual fallback so you are not stuck if the automation path misfires.
- Check power and Wi-Fi on every device.
- Open the app and confirm the scene names are obvious.
- Run one manual trigger before the live session.
- Verify the clock and light react the way you expect.
- Keep a simple fallback mode ready in case the advanced path stalls.
If you want the simplest way to get started, stay with the app-based light path and build one or two reusable presets. If you need cross-device automation, use the Smart Pixel Clock as the most defensible advanced branch and add MQTT only after the base scene is stable.
Wrap-Up
Smart studio automation works best when you keep the lights simple, use the Smart Pixel Clock for the more advanced branch, and test the full chain before you rely on it. The safest default is app-based control for Ulanzi lights, with Home Assistant or MQTT added only when the setup needs cross-device coordination. If you want to build this kind of workflow, start with one clean preset and one fallback path, then expand only after the base scene holds up.
FAQs
Can I Automate Ulanzi Lights With Home Assistant?
Sometimes, but do not assume every Ulanzi light has the same third-party support. The safer path is to keep lights in the app unless you have verified a specific integration route for that model and firmware. That keeps the setup easier to recover if a scene stops responding.
How Do I Sync a Smart Pixel Clock With Lighting Scenes?
Use the clock as part of the trigger or status layer, not just as a display. In practice, that means pairing it first, confirming MQTT or Home Assistant behavior, and then tying it to a scene cue like stream start or call mode. Keep the first version simple so you can tell whether the automation is working.
Why Do My Scenes Work Once but Not Every Time?
Intermittent behavior usually points to network drops, discovery issues, or scene logic that stacks commands instead of replacing them. Recheck the broker, power, and naming first, then reduce the scene to one action and add complexity back slowly.
Can One Scene Work for Streaming and Video Calls?
Yes, if you treat it as a shared base preset. The best workflow is usually one core scene with small variations for brightness or color temperature, rather than two totally separate setups. That keeps the system easier to remember when you are moving quickly.
What Should I Check Before a Live Session?
Run a full dry test. Confirm power, Wi-Fi, scene names, manual fallback, and a simple recovery path. If the automation does not behave exactly the same way twice in a row, fix that before you go live.