A small RGB pocket light makes a poor video key light in two cases. Either it can't light your whole subject from where you plan to put it, or it gives harder shadows than your shot calls for. Pocket size alone doesn't rule it out: if it covers your frame and the shadows fit the look, it can stay your key.

When a pocket light is a poor key
The key light is the main light on your subject. It sets the brightness and shapes the face. A pocket light can fail that job in two separate ways, and either one is enough to move it to a different role.
The first is coverage and usable output. From its planned spot, the light has to reach everything the frame needs lit, at a level your camera can expose well. The second is shadow character. The light has to give the soft or crisp shadow edges your shot calls for. A light can pass one test and fail the other, so judge them separately.

Your setup decides the result, not the product category. Picture a solo creator at a desk, framed head and shoulders, with the light close by. That shot may work fine with a pocket light as the key. Now widen to a waist-up frame, add a second person, or move the light across the room. The same light faces a new job and needs a new check. No single brightness number marks the line between a good key and a poor one. Your intended shot is the test.
Check coverage in the intended frame
Check coverage at the real distance and frame, because increasing distance spreads light over a larger area and lowers brightness at any given spot. Beam spread matters too, since it sets how much light reaches that spot. Run this check before you decide:
- Lock the frame and light position you'll actually film with. Set the camera to its final framing and seat your subject where they'll be. Put the light where it will live during the shoot, whether that's a desk clamp, a stand, or a cold-shoe mount.
- Use the real mode and modifier. Pick the color or white mode, brightness level, and any diffuser you plan to use. A listed output figure measured at another distance or in another mode won't tell you how this shot will look.
- Judge the subject on the camera screen at your normal exposure settings. Look for even light across the face. Watch whether brightness drops off before the shoulders, hands, or desk items you want lit. Notice whether you have to raise ISO or gain past your comfort level just to expose the face.
- Treat a miss as a limit of this setup. Moving the light closer puts more light on a smaller area. Moving it back spreads light wider but dimmer. After any move, check the frame again.
If the subject still looks underlit or patchy after these steps, the light isn't a good key for this shot. That says nothing about how it would do in a tighter frame or a closer position.
Match shadow softness to the shot
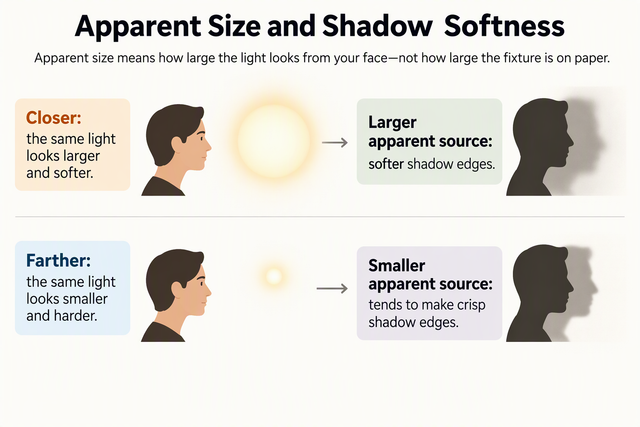
Shadow look is its own test, because diffuse area lights soften shadows compared to point sources. A small bare emitter acts more like a point source, whereas a large diffused surface acts more like an area light. What matters is how large the light appears from the subject's position.
Size and distance work together. A smaller source gives a quicker shadow-edge transition, and a larger one gives a slower, more gradual edge. Distance changes that edge too. So the same pocket light can give different shadows at arm's length than it does across the room.
To check, look at the shadows in your planned setup. Watch the shadow under the nose, along the jawline, and any shadow your subject casts on the wall behind them. If you want soft, gentle shading for a talking-head video and those edges look crisp, the light doesn't fit that look as is. If your style calls for more defined, dramatic shadows, a harder edge may be just right.
Diffusion or bounce can change a source's character. You can diffuse it through cloth or bounce it off a board or umbrella. How much softer the result gets depends on the setup, so judge the new shadow in the same frame. Our softbox placement tips cover positioning for softer shadows. If your room itself seems to make shadows harsh, see why small rooms create harsh shadows. Moving the light also changes coverage, so rerun the frame check after any change.
What to change when the pocket light misses
If the pocket light passes both checks in your real shot, keep it as your key. If it misses, match the fix to the test it failed and then judge the new setup in the same frame:
- Coverage or output miss: Try a key you can position on its own, such as a fixture on a dedicated light stand set at the distance your frame needs. You can also try one of the larger LED video lights. The goal is the same as before: even, well-exposed light across the whole subject on your camera screen.
- Shadow-look miss: Try a bigger diffused source for the key, such as a light fitted with a dedicated softbox, or bounce the light off a large surface. Then check the shadow edges under the nose and jaw again. If you're weighing different approaches, you can compare lighting setups by softness, beam control, and room depth.
When another source takes over as key, your RGB pocket light can still earn its place. Try it as close fill on the shadow side, as a hair or background light, or as a colored accent like RGB pocket lights for sunset looks. Keep it in that role only if it looks right in the shot. For more on placing a key for interviews, the MIT OpenCourseWare lighting lecture covers interview lighting setups and equipment.
FAQs
Can an RGB pocket light produce a neutral key light?
The RGB label tells you the light can make colors. It doesn't tell you whether it also has an adjustable white or color-temperature (CCT) mode. Check the spec sheet for a listed white or CCT range. If that mode is there, set it to match your other lights and judge skin tones on your camera screen before you count on it as a neutral key.
Does diffusion alone make a pocket light suitable as a key?
Not by itself. A diffuser can change how soft the shadows look, but it doesn't tell you whether enough light reaches the subject or covers the whole frame. Put the modifier on, set the light in its planned spot, and check both the exposure and the shadow edges again before you decide.
Can a pocket light still be useful if it is not the key?
Yes. A small light can work well as close fill, a rim or hair light, or a colored background accent, as long as that placement gives the result you want. Doing well in a supporting role doesn't mean it can handle the key job, though. It only shows that it fits that particular role.