Travel tripod wind stability comes down to leverage, contact, and setup more than payload numbers. If your tripod looks fine indoors but shudders on a bluff, beach, or sidewalk, the fix is usually to lower the center column, widen the stance, and keep extra weight from swinging. The best setup depends on the surface and how exposed the location is, so treat wind resistance as a field decision, not a spec-sheet promise.

Why Travel Tripods Wobble in Wind
A lightweight travel tripod can feel solid on a living room floor and still wobble outside because wind pushes on the camera like a lever. The higher the camera sits, the more that force can amplify small flex in the legs and head. That is why why the center column is the weak point matters so much: raising it to full extension reduces stiffness and makes vibration take longer to settle.
That same pattern shows up in the places travel creators shoot most often. An overlook, boardwalk, campsite, or sidewalk setup usually has some mix of gusts, uneven contact, and a rush to get the shot before light changes. In those conditions, load rating alone is not a reliable comfort check. A tripod can technically hold the gear and still feel lively in wind.

The practical takeaway is simple. If a tripod only feels stable when everything is tucked low and centered, it is probably not the same thing as a rig that stays calm at eye level outdoors. Center column trade-offs are worth checking before you assume the problem is the brand or the payload number.
Set Up a More Stable Base
For most travel vloggers, the fastest stability gains come from setup, not shopping. Start with the biggest leverage changes first, then work down to smaller adjustments. Why leg order affects stability is a good reminder that the thickest leg sections should come out before the thinner lower sections when you can avoid them.
- Lower the center column as far as practical.
- Extend the thicker leg sections first.
- Widen the stance without making the footprint awkward to place.
- Level the feet and check for soft spots, tilt, or twisting.
- Keep the camera, monitor, and handle as close to the apex as your framing allows.
That sequence works because it shortens the lever arm before you start chasing smaller problems. If the camera sits lower and the legs are using their stiffer sections, the whole setup has less opportunity to shake. When a location is exposed, turn the tripod so a leg or narrow side faces the strongest gusts, and use any natural windbreak you already have, such as a wall, rock, or vehicle. That is a practical heuristic, not a guarantee, but it often helps in real shoots.
A quick pre-shoot check can save a retake later. Push gently on the head, watch whether the tripod settles quickly, and listen for foot slip on smooth ground. If the rig keeps swaying after a small bump, shorten the setup before you try to "fix" it with accessories.
Weight, Ballast, and Portability Trade-Offs
Added weight can help, but only when it is applied in a way that does not create new motion. Hanging a bag from the center hook may improve stability, yet a swinging load can create a pendulum effect and make the rig twitchier in gusts. That is why why hanging weight can backfire is an important caution, not a contradiction.
The trade-off is usually between three choices:
| Option | Portability Impact | Setup Speed | Wind Benefit | Best Fit |
|---|---|---|---|---|
| Lower, lighter rig with no ballast | Best for travel | Fastest | Modest | Mild breezes, short shots, frequent moving |
| Ballast added carefully at the base | Moderate | Moderate | Helpful when grounded well | Gusty locations with room to carry extra gear |
| Heavier packable tripod | Higher | Fast to medium | More consistent | Exposed outdoor use where stability matters more than ounces |
This is where the decision flips for many people. If you shoot mostly in sheltered city spots or quick travel clips, a heavier tripod can feel like dead weight in your bag. If you regularly work on coastlines, ridgelines, or open viewpoints, the extra mass may be easier to live with than constant wobble. A separate browse path like natural anchors can also help if your location gives you a safe way to tie the setup down or brace it without swinging.
Accessories That Improve Wind Stability
Accessories help most when they solve a specific problem. They do not all increase stability in the same way. The tripod connection standard matters because the camera-to-support interface is where play and looseness can show up first. That is especially relevant if you switch plates or use a quick-release ecosystem, because a secure fit is more useful than a fast one that rattles.
Quick-Release Choices for Faster Repositioning
Quick-release systems are mainly about speed, not wind resistance. They help when you need to move fast between shots, re-level after a location change, or adjust the rig before the light shifts. The real stability gain comes from reducing setup mistakes, not from the release mechanism itself. If a plate or clamp has noticeable play, that is a problem for windy work even if it feels convenient indoors.
Leg Grip and Ground Contact Helpers
Feet and ground contact matter a lot more than most buyers expect. On soft-ground foot placement like grass, sand, dirt, or damp terrain, spikes can anchor better than rubber feet because they bite into the surface instead of skating over it. On smooth concrete, the benefit may be smaller, so the surface should guide the choice.
That is also why compatibility checks matter before you buy anything. A foot upgrade that does not match the leg interface, or a plate system that does not fit your camera and head, solves the wrong problem. For outdoor vlogging, it is usually better to choose one accessory that fits the terrain and mounting system well than to stack three small add-ons that complicate the setup.
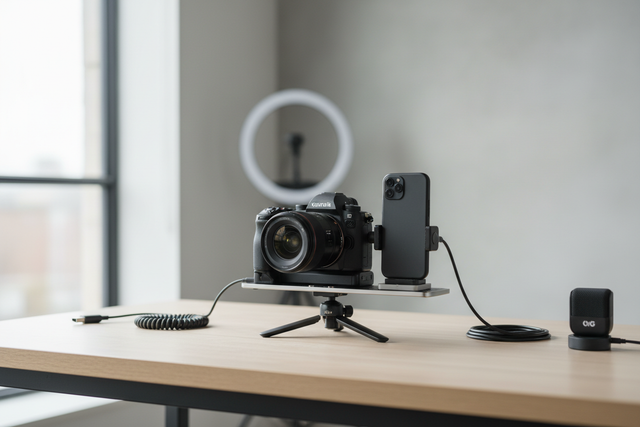
If you are comparing lightweight tripods for travel, the safest browse path is to start with travel tripod deals and then verify whether the model's stance, lock feel, and accessories match the conditions you actually shoot in. If you already know you want a faster setup system, check the quick-lock travel tripod and confirm that the interface suits your camera before assuming it will be steadier in wind. For a more compact travel-style option, a lightweight travel tripod may fit carry-on needs, but you still need to check whether the height and stance work for exposed locations.
A Wind-Stability Checklist Before You Shoot
- Keep the center column as low as the frame allows.
- Use the thicker leg sections first, and avoid thin lower sections unless you need the height.
- Check the feet for slip, especially on concrete, sand, or damp ground.
- Keep the camera and handle close to the tripod apex when you can.
- Recheck the rig after every move, because a stable setup can change as soon as you shift position.
- If gusts are strong enough to keep the rig moving after small touches, wait, relocate, or lower the shot instead of forcing the setup.
The safest habit is to treat stability as a moving target. A setup that works at the start of a shoot may need a lower profile ten minutes later when the wind shifts. For travel tripod wind stability, convenience should win only when it does not push the rig outside its comfort zone.
FAQs
Does a Travel Tripod Wobble at Full Height?
Usually, yes, a fully extended travel tripod is more likely to sway because the camera sits farther from the ground and has more leverage against the legs. The practical fix is to lower the center column first and only raise height when the shot really needs it.
Is F38 Stable in Wind?
It depends on the whole rig, not just the label. Camera weight, head tightness, leg spread, column height, and ground surface all affect whether a setup feels steady. If you are comparing an F38-based setup, check the interface and the base geometry before treating the ecosystem name as a stability promise.
How Can I Prevent Tripod Wobble in Wind?
Start by lowering the center column, then widen the stance, keep the camera close to the apex, and use ballast only if it does not swing. After that, check the feet and the surface. If the setup still moves after a light bump, it is usually better to shorten the rig than to keep adding gear.
What Makes a Stable Travel Tripod for Outdoor Vlogging?
A stable travel tripod for outdoor vlogging usually combines a compact fold, a stance wide enough for the surface, solid leg locks, and a head that does not feel loose under motion. It should also be quick to deploy, because a rig that is annoying to set up often ends up rushed and less stable in real use.
Can I Use Extra Weight to Help a Lightweight Tripod in Wind?
Yes, but only if the weight stays controlled. A hanging bag can help on some setups, while a swinging load can make things worse. If you use ballast, keep it from acting like a pendulum and remember that the ground, tripod design, and shooting height still matter.