Install the shotgun microphone, deadcat windscreen, and cage exactly as you plan to shoot, then switch to your wide-angle or 0.5x lens and look at the live frame. If any part of the rig shows up, move the microphone to a different mounting point on the cage, add a side offset, or accept a crop, then retest before you hit record. A standard-lens preview cannot confirm wide-angle clearance, so the fix always starts with the actual recording view.
Why the Microphone Clears the Standard Lens but Enters the Wide-Angle Shot
A wider recorded view can bring cage hardware into frame that a standard lens never showed. The lens you actually record with sets the visible boundary, so a microphone that sat comfortably outside the standard-lens composition can still land inside a 0.5x frame.
The deadcat windscreen makes this worse because it is almost always larger than the microphone body underneath it. Checking only the microphone barrel or capsule position misses the windscreen's wider silhouette, along with the mount arm, the cage rail it clamps to, and the cable running back to the phone. All of that hardware is part of one physical shape that either clears the frame or does not. The only way to know is to look at the wide-angle view with everything installed, not to judge the microphone in isolation or trust how it looked through the standard lens.
Measure the Complete Phone-Cage Microphone Setup
Before you pick a cage position, adapter, or extension, record the exact dimensions and interfaces of your phone, case, cage, microphone, deadcat, and cable as one assembled system.
- Identify the lens you will record with and the orientation (landscape or portrait) you plan to shoot in.
- Measure your phone and case against the cage's listed phone-fit range. As a labeled example, the Ulanzi Lino 2792 cage has a supported smartphone cage size rated up to 8.2 cm wide and 13 to 16.5 cm long, with cold-shoe or universal 1/4-inch accessory connections; those figures apply only to that model, not to other cages.
- If you are using that same cage, note its listed cage dimensions of 23.5 x 12.7 x 2.0 cm and weight of 245 grams for reference when checking balance, but treat those numbers as specific to that cage rather than proof that your deadcat will clear the frame.
- Measure the microphone, deadcat, and mount as one combined footprint, plus the cable's resting position when connected.
- Confirm the exact thread, cold shoe, or adapter interface you intend to use, and check that this attachment path still leaves the lens, screen, buttons, microphones, and charging port reachable.
A mounting interface only tells you the microphone can attach; it does not tell you where the assembled rig will sit relative to the frame. Our complete phone-rig fit guidance treats the phone, case, cage, microphone, deadcat, cables, and orientation as one system, because counting attachment points alone overlooks clearance, port access, and cable routing once everything is installed together.

Test the Final Wide-Angle Frame Before Choosing a Fix
Tighten the mount in your final shooting orientation, switch to the wide-angle lens, and check the live image for any part of the microphone, deadcat, mount, or cable at the edges. A still preview is not the full test, because rotating or gripping the rig can shift the cable or the mount just enough to enter the shot.
Walk through the phone-rig audio clearance check with the deadcat installed: confirm the lens stays clear, the screen and controls remain visible and reachable, and your hand path to the grip does not bump the microphone. Then record a short test clip and play it back. If the deadcat, mount, or cable intrudes on the frame, restricts a control, or shifted during handling, that position has failed and needs a different arrangement rather than a small crop after the fact.
For a closer look at how mounting position interacts with your framing before you commit to a fix, our guide on live mic placement checks walks through the same kind of live-view inspection for rig-mounted microphones.
Choose the Least Disruptive Mounting Remedy
Once you know whether the current position passes or fails, choose the remedy that clears the frame with the fewest new problems. Keep the current placement if it already passed; otherwise work through the options below in order of how much they change your rig.
| Remedy | Use when | Consequence or check |
|---|---|---|
| Keep current placement | The complete rig passed the wide-angle and movement test | No further action; retest if you change cages, phones, or lenses |
| Reposition or side/offset mount | Another cage point clears the frame and keeps controls reachable | Retest balance, cable path, and hand access after moving it |
| Extension arm | The exact accessory is confirmed compatible with your cage and microphone | New joints must stay stable through the playback test; recheck after any adjustment |
| Alternate microphone arrangement or crop | No mounting position clears the frame | Treat this as a new setup and repeat the full frame and stability test |
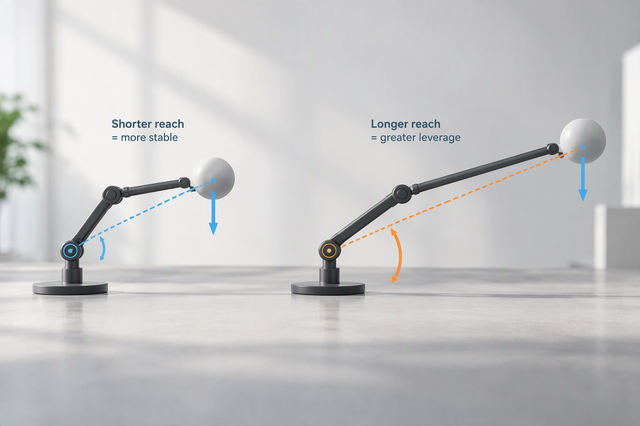
Repositioning or a side offset is worth trying first because it changes the least about your existing rig. Our portrait-format side-offset and extension guidance is conditional and not a 0.5x-specific fit claim: it describes moving a microphone off to the side or adding an extension arm when a vertical crop would otherwise show it, then reframing before tightening. That logic supports retesting your wide-angle setup the same way, but it does not confirm that any specific offset distance or extension length will fit your exact microphone and deadcat. An extension arm only counts as a fix once its added joints hold steady through a full playback test, since a longer reach also adds leverage that can shift under handling. Cropping or switching microphones is a separate setup change, not proof the original rig works, so it needs the same clearance and stability test before you rely on it.
Secure the Rig, Route the Cable, and Confirm Stability
Once you have picked a position that clears the wide-angle frame, tighten the mount in that exact orientation and route the cable so it stays out of the shot and away from your grip. This step comes after the framing decision, not before it, since tightening an untested position wastes the adjustment.
Leave controlled cable slack for planned rotation and grip changes rather than a loose loop that can drift into frame or catch on your hand. Rotate and hold the rig the way you actually will while filming, and reroute the cable if it pulls the connector, rubs against the cage, or shifts position. Confirm the lens, screen, controls, and port stay clear, then record one more short clip and review it. If the setup holds steady and stays out of the wide-angle frame through that final check, it is ready to record.

FAQs
How do I keep a microphone and deadcat out of a wide-angle phone shot?
Install the microphone and deadcat exactly as you plan to shoot, switch to your wide-angle lens, and check the live frame for any part of the rig at the edges. If it intrudes, move it to another cage point or a side offset and retest; if nothing clears the frame, treat a crop or a different microphone arrangement as a new setup that needs the same test. Confirm the final position also stays stable and accessible during a short recorded playback before you rely on it.
Why does the deadcat show up in 0.5x mode when the standard lens was clear?
The ultra-wide 0.5x camera captures a significantly broader field of view than the standard lens, pulling in peripheral mounting points. Additionally, a deadcat windscreen creates a much wider physical outline than the microphone body alone, making it easy for stray fibers or windscreen edges to encroach on wide shots.
How should microphone cables be routed to prevent shot obstruction and handling noise?
Route the cable with controlled slack along the cage structure so it cannot swing into the wide camera view during rapid pans. Avoid overly loose loops that rub against your hands or phone ports, and verify that the cable does not place strain on the recording jack during movement.