Essential Equipment for Your Solo Vlogging Setup
Choosing the right tools makes a significant difference when you start making videos alone. Here is a breakdown of the basic gear needed to capture great video and audio without a production crew.
Camera or Smartphone: Start With What You Already Have
Modern smartphones are entirely sufficient for beginner vloggers. You do not need a high-end cinema camera to get started. When using your phone, look for a few key features that make a beginner vlogging setup successful:
- 4K video recording for crisp image details.
- Fast autofocus to keep your face sharp when you move.
- A front-facing screen or flip screen to monitor your framing.
- Good built-in stabilization to reduce shaky movements.
Beginners should only consider upgrading to a dedicated vlogging camera after they build a consistent posting habit. Your camera choice should depend on your specific content type rather than simply buying the most expensive gear on the market.

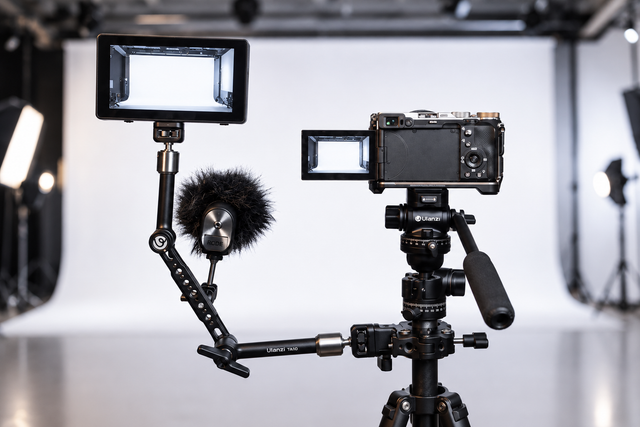
A Tripod: The Foundation of a Solo Vlogging Setup
A tripod is the very first accessory a beginner should buy. A high-quality stand provides major benefits:
- Keeps the camera stable and eliminates distracting shakes.
- Allows hands-free filming so you can use gestures naturally.
- Makes framing easier because the camera stays in a fixed position.
- Helps maintain consistent shots across different filming sessions.
Different options exist depending on your needs. A mini tripod works best for desks and travel. A full-size tripod is necessary for standing videos. A flexible tripod with bendable legs helps with outdoor shooting on uneven surfaces. When choosing the best tripod for vlogging, look closely at its maximum height, weight capacity, portability, and whether it includes a secure phone clamp.
Microphone: Improve Your Audio Quality
Poor audio can make even high-quality video look amateurish. Viewers will tolerate average video quality, but they will quickly close a video if the sound is muffled, quiet, or filled with background hiss. Built-in camera microphones capture too much room echo and wind noise. Investing in an external microphone for vlogging fixes this instantly.
Tip: Many professional creators prioritize audio upgrades long before they buy expensive cameras. Clean sound keeps audiences engaged.
Popular options include wireless lavalier microphones that clip onto your shirt, shotgun microphones that sit on top of your camera, and USB microphones for stationary desk setups. To record cleaner audio, always reduce background noise by turning off fans, keep the microphone close to your mouth, and test the sound levels before you start your main recording.

Lighting: Make Yourself Look Better on Camera
Proper lighting directly affects your skin appearance, overall video quality, and production value. Shadows and low-light environments make video files look grainy and pixelated.
Beginner-friendly lighting options include:
- Natural window light: Free, bright, and highly flattering.
- Ring lights: Great for even face lighting and circular catchlights in your eyes.
- Compact LED panels: Portable lights with adjustable brightness and color temperature.
For a basic lighting setup for YouTube, place your main light source slightly above eye level and look toward it. Avoid strong backlighting from open windows behind you, as this turns you into a dark silhouette. Use soft, diffused light to achieve a natural, friendly look.

How to Set Up Your Camera When Filming Yourself Alone
Setting up your equipment correctly saves time and prevents technical errors. Follow these practical layout guidelines to ensure your footage looks professional and well-structured.
Find the Right Camera Height and Angle
Keep your camera lens around eye level for natural-looking videos. Placing the camera too low creates an unflattering angle, while extremely high angles can make you look small and disconnected from the viewer. Use your tripod height adjustments to bring the lens to your eyes. Check your camera preview screen and always record a ten-second test clip to confirm the angle before filming your entire script.
Frame Yourself Properly
Good framing guides the viewer’s eyes to the right spot. Leave a little bit of headroom between the top of your head and the upper edge of the video frame. Use the rule of thirds by placing your eyes along the top horizontal line of your camera grid display.
Consider your background carefully. Remove messy clothes, trash, or distracting reflections. Add subtle personal elements like books, plants, or warm lights that match your content style to make the scene visually interesting.
Check Focus and Exposure Before Recording
When filming yourself without help, a few common problems occur frequently. The camera might focus on the background instead of your face, your face might become too dark, or the lighting might shift unexpectedly mid-video.
To solve these issues, lock your focus and exposure manually if your camera allows it. If you use a phone, tap and hold the screen on your face until the focus lock appears. Turn on face-tracking autofocus features, and always play back a short test clip to verify everything looks right.
Best Solo Vlogging Setups for Different Types of Creators
Different styles of videos require specific gear arrangements. Match your equipment setup to your content goals to get the best results without overcomplicating your workflow.
Beginner YouTube Talking-Head Setup
This setup is best for sit-down tutorials, product reviews, and educational videos. A reliable YouTube setup for beginners relies on a clear, stationary view. Use a smartphone or camera mounted on a full-size tripod. Pair this with a wireless clip-on microphone and a soft light panel placed at a 45-degree angle in front of your face.
Travel Vlogging Setup
This layout is best for travel videos, daily lifestyle content, and outdoor adventures where you need to move quickly. Your how to vlog alone kit must stay lightweight. Use a smartphone on a compact hand grip or a flexible tripod. Add a smartphone gimbal to smooth out walking steps, and use a wireless microphone with a wind muff to block outdoor breeze noise.
Home Creator Setup
This arrangement is best for gaming content, desk reviews, or cooking videos. To master how to record yourself alone at home, utilize your fixed furniture. Use a small desk tripod or an adjustable arm clamp. Connect a high-quality webcam or camera alongside a desktop USB microphone, and place small LED light panels behind your monitor screen.
Fitness and Action Content Setup
This configuration works best for workout videos, sports tutorials, and movement-based content. You need a wide-angle camera lens to capture your entire body in motion. Use a heavy, stable tripod that will not tip over easily. Consider an auto-tracking phone mount that rotates to follow your movement, and use a secure wireless microphone clipped tightly to your clothes.
| Creator Type | Best For | Recommended Equipment |
|---|---|---|
| Talking-Head | Tutorials, Reviews | Smartphone, Full tripod, Wireless mic, Soft LED |
| Travel Vlog | Outdoors, Walking | Phone, Compact tripod, Gimbal, Wind-shielded mic |
| Home Creator | Gaming, Cooking | Desk clamp, USB mic, Webcam, Small light panel |
| Fitness | Workouts, Sports | Wide lens, Heavy tripod, Tracking mount, Clip mic |

How to Film Yourself Alone Without a Cameraman
Managing a video shoot by yourself requires a systematic approach. By planning your steps and using simple technology, you can successfully run a recording session without a crew.
Plan Your Shots Before Recording
Create a simple shot list before you turn your camera on. Decide your camera positions, any specific camera movements, and your core talking points. Writing these details down keeps you organized and prevents you from forgetting important background footage while you focus on speaking.
Use Remote Control Features
Take advantage of wireless tools to make filming yourself without a cameraman much easier. Use small Bluetooth camera remotes to start and stop recordings without walking back and forth. You can also utilize smartphone companion apps to monitor your camera screen from afar, or use simple voice commands to control your device. This keeps your framing perfect and saves valuable battery life.
Record Multiple Takes and Extra Footage
Do not rely on a single take to get your video right. Record multiple versions of difficult sentences or expressions. When learning how to make YouTube videos by yourself, remember to capture extra B-roll footage. Film close-ups of items you mention, different background angles, and detail shots to make your final video edit look dynamic and engaging.
Common Mistakes Beginners Make When Filming Alone
It is easy to make mistakes when you act as the director, audio tech, and talent simultaneously. Watch out for these common errors to keep your production process stress-free.
Buying Too Much Equipment Too Early
Beginners often overspend on advanced gear before mastering basic video principles. Expensive cameras will not fix poor framing or boring stories. Focus first on securing a stable shot, clear audio, and clean lighting before upgrading your core tools.
Ignoring Audio Quality
Many new creators focus entirely on video settings and completely forget about sound. Viewers will leave your video if the audio contains heavy background static or echoing room noise. Always check your microphone connections and listen to a sample clip before recording long segments.
Forgetting Battery and Storage
Nothing ruins a filming session faster than a dead phone battery or a “storage full” warning message. Before you start recording, charge all your devices to maximum capacity, clear old files to open up memory space, and keep a backup power bank on your recording desk.
Making the Setup Too Complicated
The best setup is one you can deploy and use repeatedly within a few minutes. If your gear takes an hour to build, you will quickly lose your motivation to create content. Keep your workflows simple to maintain long-term consistency.
Build Your Solo Vlogging Setup and Start Filming
Filming alone gets easier once you find a rhythm. Forget pricey gear trends. Put your money into a steady tripod, a crisp microphone, and clean light. Your phone handles the rest. Focus your energy on practicing your delivery and telling great stories. The perfect setup is simply the one that helps you hit record quickly, comfortably, and consistently every single week.

FAQs About Solo Filmmaking
Q1. What equipment do I need to film myself alone as a beginner?
You only need four basic items to start creating videos. Use your current smartphone or a basic camera, a sturdy tripod to eliminate movement, an external microphone for clear sound, and a simple light source like a bright window or a small LED ring light.
Q2. Can I start vlogging with just my phone?
Yes, modern smartphones have excellent lenses capable of recording professional video. You can achieve fantastic results simply by adding a few inexpensive accessories, such as a desktop tripod, a clip-on lapel mic, and a compact portable light.
Q3. What is the best tripod for solo vlogging?
The best option depends entirely on your specific shooting style. Mini tripods work best for desk setups and traveling light. Full-size tripods are ideal for stationary standing videos, while flexible models or gimbals work best for active, outdoor recording.
Q4. How can I make my solo videos look more professional?
Focus on mastering the fundamentals. Ensure your room has bright, soft lighting, and use an external mic to remove echo. Keep your camera at eye level, use clean backgrounds without clutter, and plan your shot list thoroughly before pressing record.