If your demo has you moving or reframing the phone and the light has to stay aligned with it, use a phone light that travels with the phone. If the phone can hold one framing and you want to try another angle that may show the product's shape or surface more clearly, use a separately positioned pocket LED.

Neither setup wins every shot. A short recorded comparison of your actual product makes the final call.
Phone Light or Pocket LED: Choose by How the Light Moves
The real difference is placement: one light follows the phone, while the other sits wherever you place it. For phone product lighting, ask whether the light needs to track camera movement or hold an independent angle while framing stays fixed.
Think of it this way. A light that follows the phone keeps the same relationship to the lens wherever you point it. If you turn the phone, the light turns with it. A pocket LED placed on its own stays where you set it. That lets you light the product from the side, from above, or from behind while the phone faces the front.
Neither behavior is better in general. The moving setup protects consistency when the camera moves. The separate setup gives you a choice of angle when the camera does not. Your product's shape, its finish, and the framing you plan to record decide which one shows the product best. Lighting is also only one part of the shot. Audio, framing, and stability matter too, which is why we cover them together in our guide to professional phone video without a rig.

When a Light That Follows the Phone Fits
A phone-following light fits demos where the phone moves or reframes during the take and the light has to come along. If the phone and light are handled separately, they can stop pointing the way you intended once the phone shifts.
Here is an illustrative case. A solo seller films a travel mug. The clip opens on a wide shot of the whole mug, then the phone moves in for a close-up of the lid latch and tilts down to the base. If the light stays aimed with the phone the whole time, it keeps lighting whatever the lens is pointed at. A light left on the table would still be aimed at the spot where the wide shot started.
That's the job this setup does: it keeps the light-to-phone relationship steady while the shot changes. It doesn't automatically give you better exposure or a cleaner image. It just keeps the light aimed wherever you point the camera. How the light attaches is a separate choice. If you're comparing ways to keep a light on the phone, our breakdown of magnetic phone-light options covers case fit, output type, power, heat, and handheld or mounted use.
When the Phone Can Hold Its Framing, Try Separate Placement
If the phone can stay locked on one framing, a separately positioned pocket LED lets you test other light angles without touching the shot. Light from another direction can make edges, texture, or a printed logo stand out differently than light from the camera's position does.
Photigy describes an iPhone still-photo setup that used separately placed lights to reveal knife details. One light came from the left to make the cut visible. Another came from the back. A third came from the right as grazing light to show the emblem on the grip. That was a still photo, not a video, but it shows the idea well: each position was chosen to show one specific detail.
To try this yourself, keep the phone fixed first. A smartphone tripod mount on a tripod holds the framing still, so any change you see comes from the light. Then move the pocket LED around the product and watch what changes on screen. A side angle may bring out a curved edge, or it may not. The result depends on the product and the shot, so treat each angle as something to test.
If you're choosing a light for this kind of separate placement, our bi-color LED lights are one place to compare options for your setup. When you film outside in strong sun, our guide to pocket LEDs that soften harsh shadows covers positioning for that specific problem.
Compare the Recorded Product View Before You Settle
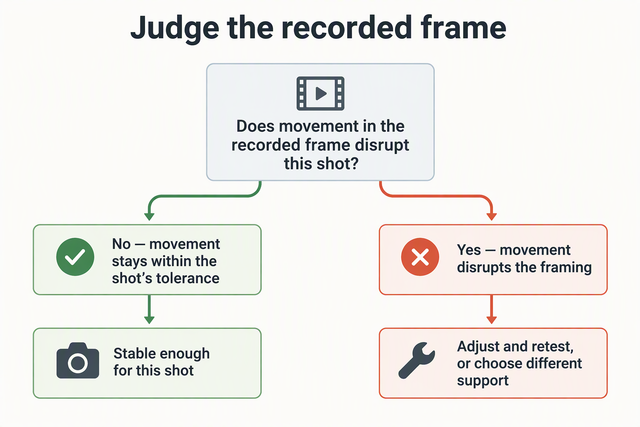
Pick the setup based on what the recording shows, not on where the light looks good in the room. Keep the product and framing the same, record each light position, and choose the clip where the shape and surface detail you need are clearest with the fewest distracting reflections. This check matters most on glossy or metallic finishes, where a reflection can cover the very detail you want to show.
- Preview placement (optional). Adobe suggests moving a phone flashlight around to preview lighting angles on the product. Use this only to narrow down likely positions. It doesn't replace recording with the light you actually plan to use.
- Lock the scene. Set the product where it will sit in the demo and frame the shot the way you'll record it. If the real demo involves moving the phone, include that same move in every test take.
- Record each light position. Shoot one short clip with the light following the phone and one or more with the pocket LED placed at a different angle. Change only the light between takes.
- Review the clips on screen. Look at three things: whether the product's shape reads clearly, whether surface details such as texture, labels, or seams are visible, and whether any glare or reflection pulls attention away from them.
- Choose or adjust. Keep the setup whose recording shows the needed detail best. If both clips hide it, move the light to a new position and record again rather than picking a winner by gear category.
This follows a principle Adobe applies to still product photography: experimenting with your light's angle and shooting the product from multiple angles so viewers can see its dimensions. Here, the recorded clip of your own phone demo is the evidence that settles your phone product lighting choice.
FAQs
Is a pocket LED automatically better for showing product detail?
No. A separately placed pocket LED lets you try angles that a phone-following light can't reach while the camera faces the front. Whether a new angle shows more detail depends on the product's shape and finish, so judge it from the recorded clip.
Should I move the product or the light during a lighting test?
Move the light. If the product and framing stay the same between takes, any difference you see in the clip comes from the light position. Moving the product at the same time makes it hard to tell what caused the change.
How do I handle reflections on glossy or metallic packaging?
Shift the light's height or off-axis distance slightly away from the direct reflection angle back into the lens, or add a basic diffusion cover to spread hot spots across shiny surfaces.
Why does a phone flashlight look different on camera than an actual LED light?
A phone flashlight produces a fixed, narrow beam with a set color temperature. An adjustable pocket LED provides wider, softer coverage and controllable brightness levels suited to camera sensors.