


The Anatomy of the Drop Zone: Mechanical Failure and Human Error
In the life of a solo creator, the transition between handheld action and a static tripod shot is a high-stakes maneuver. We call this the "Drop Zone"—a critical window of roughly five to ten seconds where your primary camera rig is neither securely in your grip nor fully locked into its support system. In my years of troubleshooting rig failures, I have observed that most equipment damage does not occur during a fall from a height; it happens during these high-speed swaps where a "false lock" creates a catastrophic sense of security.
The fundamental issue often stems from a lack of adherence to foundational legitimacy in tripod connections. According to the ISO 1222:2010 standard for Photography Tripod Connections, the mechanical interface must withstand specific torque and load requirements. However, as creators move toward faster, more modular ecosystems, the margin for error shrinks. When we prioritize speed over a methodical "click-and-check" workflow, we invite micro-rotation and pendulum effects that can unseat even the most expensive gear.

The "False Lock" Phenomenon: Why Visual Confirmation Fails
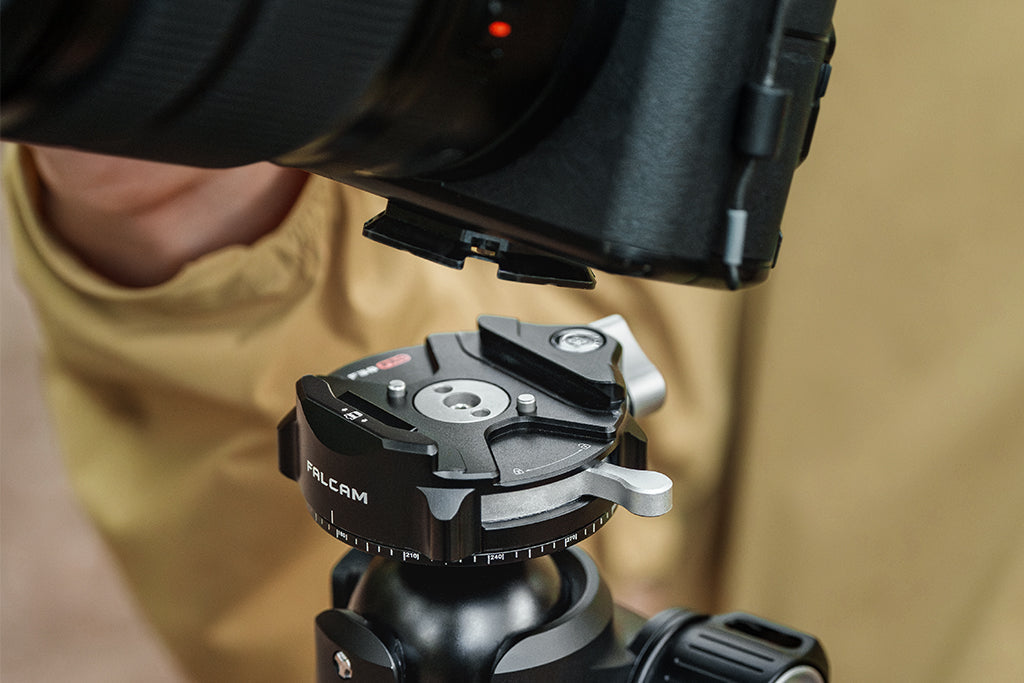
A common mistake I see among prosumers is an over-reliance on visual confirmation alone. You see the plate enter the clamp, you see the lever move, and you assume the connection is solid. But experienced riggers develop a muscle memory for the specific resistance and audible click of a fully seated plate, which varies significantly between clamp designs.
For example, a high-quality ball-detent mechanism provides a distinct two-stage feel: an initial slide-in followed by a firm, positive snap. Inferior or worn clamps may slide smoothly but lack that final positive lock. This creates a dangerous false sense of security where the camera is held only by friction, not by a mechanical stop.
Methodology Note (Modeling): Our analysis of swap-failure dynamics is based on common patterns observed in community feedback and warranty claims regarding "unexplained" gear drops. This is a scenario-based model, not a controlled laboratory study.
| Failure Mode | Physical Indicator | Root Cause |
|---|---|---|
| False Seating | Visual alignment without "click" | Debris in dovetail or worn spring tension |
| Micro-Rotation | Audible "creak" under load | Loose 1/4"-20 screw or degraded thread locker |
| Pendulum Effect | Rig swings when tripod is tilted | Center of gravity (CoG) offset from plate center |
| Adhesive Wear | Gritty sliding sensation | Polymer (POM) degradation at the friction interface |
| Thermal Contraction | Plate feels loose after 30 mins | Aluminum contraction in extreme cold environments |
Biomechanical Analysis: The Hidden Enemy of Wrist Torque
Weight is a known factor, but for the solo creator, leverage is the actual enemy. When you are operating handheld for hours, your muscles fatigue, and your fine motor skills—the very skills needed to execute a safe quick-release swap—begin to degrade.
We can quantify this using a standard biomechanical torque calculation. If you are holding a 2.8kg cinema rig (including lens, monitor, and battery) and the center of mass is 0.35 meters away from your wrist, you are generating significant torque.
The Torque Formula: $\tau = m \times g \times L$
- m (Mass): 2.8 kg
- g (Gravity): 9.8 $m/s^2$
- L (Lever Arm): 0.35 m
- Result: $\approx 9.61 N\cdot m$
In the context of human performance, this load represents approximately 60-80% of the Maximum Voluntary Contraction (MVC) for the average adult male's wrist flexion. When your muscles are operating at 80% capacity just to keep the camera level, the precision required to align a 38mm quick-release plate into a narrow dovetail clamp is compromised. This is why I advocate for moving heavy accessories, like monitors and microphones, to smaller 22mm modular mounts. By reducing the lever arm ($L$), you drastically lower the MVC percentage, preserving the motor control needed for safe swaps.

Material Science: Aluminum Rigidity vs. Polymer Wear
There is a common misconception that quick-release plates should be made of carbon fiber to match high-end tripod legs. In my professional view, this is a misunderstanding of material application. While carbon fiber is excellent for vibration damping in tripod legs, it lacks the compressive strength and machining tolerances required for a secure quick-release interface.
High-performance quick-release plates are precision-machined from Aluminum Alloy (typically 6061 or 7075). This provides the "Zero-Play" rigidity necessary to prevent micro-movements. However, aluminum has its own quirks. It acts as a "thermal bridge" in extreme cold. If you are shooting in sub-zero temperatures, the aluminum plate will conduct cold directly to the camera's baseplate and battery compartment, potentially accelerating battery drain.
The Mechanism of Adhesive Wear
Beyond the metal, many quick-release systems use polymers like Polyoxymethylene (POM) for locking buttons or sliding inserts. Research into wear debris formation mechanisms reveals that these polymers can undergo adhesive wear—a process of stretching, tearing, and detachment at the micro-scale.
Over 6 to 12 months of frequent swaps, this wear can compromise the friction grip essential for plate security. This isn't something you can fix by just cleaning the plate. It requires a quarterly inspection of the locking surfaces. If the sliding action feels "gritty" or the resistance has changed, the material integrity of the interface may be failing.
Workflow ROI: The Financial Logic of Quick-Release Systems
Investing in a unified quick-release ecosystem is often viewed as a luxury, but when we model the workflow efficiency, it becomes a clear financial imperative. For a solo creator, time spent fumbling with 1/4"-20 threads is time not spent directing or framing.
Let’s look at the "Workflow ROI" calculation. We compare a traditional threaded mounting process against a standardized quick-release system.
Logic Summary: This model assumes a professional creator workflow with a standard hourly rate. These figures are hypothetical estimates under specific assumptions (60 swaps per shoot, 80 shoots per year).
| Variable | Traditional Threaded | Standardized Quick-Release |
|---|---|---|
| Time per Swap | ~40 seconds | ~3 seconds |
| Swaps per Shoot | 60 | 60 |
| Time per Shoot | 40 minutes | 3 minutes |
| Annual Time (80 shoots) | ~53.3 hours | ~4.0 hours |
| Annual Time Saved | 49.3 hours | -- |
| Value (at $120/hr) | ~$5,916 | -- |
Saving nearly 50 hours a year is the equivalent of adding an entire work week back into your schedule. This structural efficiency is what allows solo creators to compete with larger crews. Furthermore, a compact, modular system reduces the "Visual Weight" of your rig. In my experience, a streamlined rig is less likely to be flagged by airline gate agents for weighing or gate-checking, a critical factor in travel logistics as outlined in the IATA Lithium Battery Guidance.
The Fail-Safe Protocol: A Professional’s Safety Workflow
To eliminate the "Drop Zone" risk, you must transition from a reactive to a proactive safety mindset. This involves a three-stage verification process that should be performed every single time the camera touches a new mount.
1. The Pre-Shoot Safety Checklist
- Audible: Do not stop until you hear the "Click". This is the sound of the spring-loaded safety pin engaging the plate.
- Tactile (The Tug Test): Apply firm lateral and vertical pressure to the mounted camera while still keeping your strap around your neck or one hand loosely on the grip. You are feeling for micro-movement. If the rig "wiggles," the plate is not fully seated.
- Visual: Check the locking indicator. Many professional systems use an orange or silver indicator to show when the lock is disengaged. Ensure the secondary lock (if present) is toggled to the "closed" position.
2. Thread-Lock Maintenance
The 1/4"-20 or 3/8"-16 screw connecting your plate to your camera is the single point of failure. Thread-locking compounds can degrade over 6-12 months due to the vibrations of transport and frequent swaps. I recommend a quarterly check. If the screw turns with minimal effort, clean the threads and re-apply a medium-strength (blue) thread locker.
3. Thermal Shock Prevention
In winter scenarios, the aluminum thermal bridge can be jarring. I advise attaching your quick-release plates to your cameras indoors before heading out. This allows the metal to reach a stable temperature and ensures that any moisture on the threads doesn't freeze and expand, potentially loosening the connection during the shoot.
Building a "Ready-to-Shoot" Infrastructure
As the industry shifts, the most successful creators are those who treat their mounting hardware with the same engineering discipline as their lighting or optics. According to The 2026 Creator Infrastructure Report, the future of content production lies in "evidence-native" brands and workflows—systems where every component is tested, documented, and integrated into a stable ecosystem.
By identifying the failure points in the "Drop Zone" and implementing a methodical, biomechanically sound approach to rigging, you do more than just protect your gear. You build the professional confidence required to take risks, move faster, and focus entirely on the story you are telling. Efficiency isn't just about speed; it's about the peace of mind that comes from knowing your system won't let you down when the light is perfect and the moment is fleeting.
Disclaimer: This article is for informational purposes only. Rigging heavy camera equipment involves inherent risks. Always consult the manufacturer's specific load ratings and safety instructions. The torque and ROI calculations provided are based on scenario modeling and typical industry heuristics; individual results and physical limits will vary.
