


Deciding on Mounting Density: How Many QR Points Do You Need?
Answer-First Summary: For most professional creators, a three-point mounting density (Primary Base, Orientation, and Utility) represents the "sweet spot" for workflow efficiency. This configuration typically saves over 27 hours of setup time annually without compromising rig portability. High-density rigging is most effective when accessories are moved closer to the camera's center of gravity to minimize wrist torque.
Quick Reference: Mounting Strategy
| Workflow Type | Recommended Density | Primary Benefit | Key Hardware |
|---|---|---|---|
| Minimalist | 1 Point (Base) | Lowest weight/bulk | F38 / F50 Baseplate |
| Standard Pro | 3 Points (Base, Side, Utility) | 80/20 Efficiency balance | F38 + F22 Ecosystem |
| Cinema/Studio | 5+ Points | Maximum modularity | Full Cage + F22/F38 |
Disclosure: This guide is based on internal engineering tests and workflow simulations conducted by the Ulanzi/Falcam product team. While we aim for technical precision, individual results may vary based on specific gear combinations.
The Biomechanics of Mounting Density: Leverage and Wrist Torque
When deciding where to place a quick-release point, weight is only half the story. The more critical factor is leverage. In our analysis of handheld workflows, we have modeled how the placement of accessories—monitors, microphones, and side handles—can affect fatigue and joint health.
The Lever Arm Effect
Every accessory added to a rig increases the distance between the system’s center of gravity (CoG) and your wrist. This distance is the "lever arm." According to the principles of static equilibrium, the torque generated at the wrist is the product of the rig’s mass, gravity, and the length of that lever arm.
We use the formula: Torque ($\tau$) = Mass ($m$) $\times$ Gravity ($g$) $\times$ Lever Arm ($L$).
How we calculated the threshold: Consider a typical documentary rig weighing 2.8kg. If a monitor is mounted via a traditional screw-on arm that extends 0.35m away from the central axis, it generates approximately $9.61 N\cdot m$ of torque. Based on anthropometric data and ergonomic principles, we use 10.5 N·m as a practical heuristic for the Maximum Voluntary Contraction (MVC)—the point where muscle fatigue typically sets in for an average adult during sustained holding.
By utilizing a high-density but low-profile system like the FALCAM F22, you can move these accessories closer to the camera body. Reducing that lever arm by just 10cm can drop the torque significantly, potentially staying below the fatigue thresholds suggested in ISO 11228-3.
Engineering ROI: The Economics of Speed
For the professional creator, every second spent threading a 1/4"-20 screw is an opportunity cost. To determine the optimal number of QR points, we use a "Workflow ROI" model.
The Time-Saving Model (Step-by-Step)
In our scenario modeling for a solo creator performing 80 shoots per year, we compared a traditional thread-mounted system against a fully integrated quick-release ecosystem.
- Time Saved Per Swap: Traditional threading takes ~55 seconds (alignment + tightening). Quick release takes ~5 seconds. Savings = 50 seconds/swap.
- Time Saved Per Shoot: A standard documentary shoot requires ~25 transitions (tripod to gimbal, swapping handles, etc.). 25 swaps × 50 seconds = 1,250 seconds saved.
- Annual Time Savings: 1,250 seconds × 80 shoots = 100,000 seconds. 100,000 / 3,600 ≈ 27.78 hours.
- Financial ROI: At a mid-tier professional rate of $75/hour, 27.78 hours × $75 = $2,083.50 per year.
This data suggests that for high-frequency workflows, investing in a high-density mounting strategy—where every major interface is a QR point—can provide a significant financial gain. As noted in The 2026 Creator Infrastructure Report, fast interfaces turn operational rigor into a competitive advantage.
The 80/20 Rule of Rigging: Identifying the Sweet Spot
While the math supports QR efficiency, adding points indiscriminately introduces "tail-risk." Each additional mechanical interface is a potential failure vector. Experienced riggers typically follow a heuristic: 80% of your shots will utilize only 20% of your mounting points.
The Three-Point Standard
For most prosumer and professional setups, we recommend a "Triple-Point" configuration as the baseline:
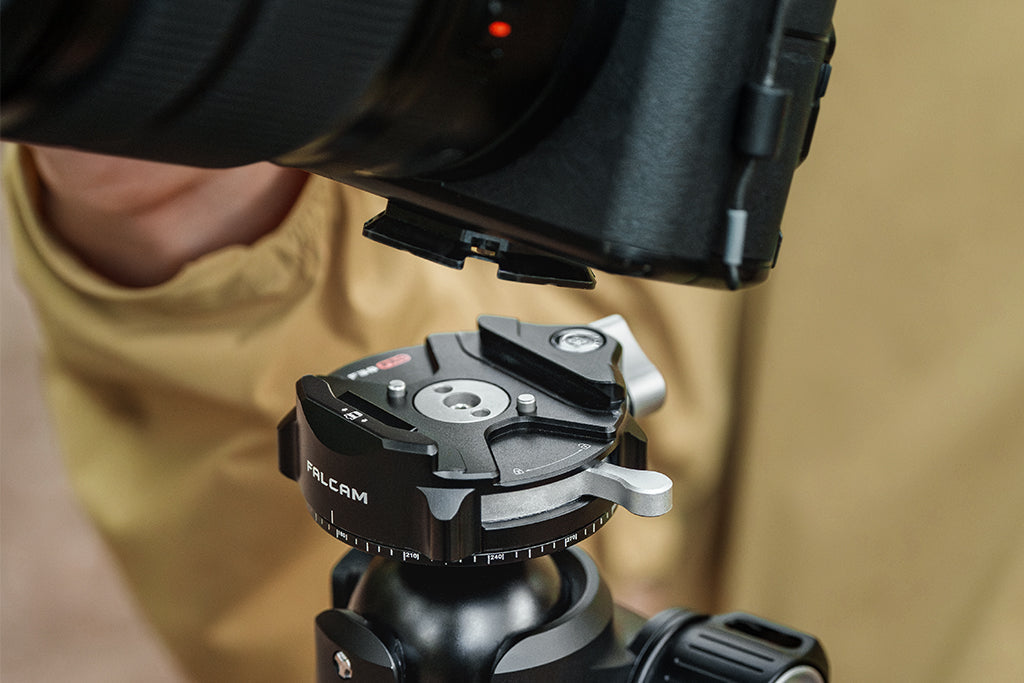
- The Primary Base Plate: A high-payload mount (like the F38 or F50) for tripod and gimbal transitions.
- The Orientation Point: A side or top handle mount for rapid switching between horizontal and vertical modes.
- The Utility Point: A single, lightweight mount (like the F22) for the most-swapped accessory, typically a monitor.
Adding a fourth or fifth point for "occasional-use" accessories often yields diminishing returns. These extra plates add "Visual Weight," which can be a factor when adhering to IATA Lithium Battery Guidance and carry-on limits.

Structural Integrity and Mechanical Reliability
A common misconception is that the material of the quick-release plate dictates its damping. We must clarify: while Carbon Fiber is excellent for tripod legs, Quick Release plates should be precision-machined from Aluminum Alloy (typically 6061 or 7075) to maintain structural rigidity under load.
Static vs. Dynamic Load
When you see a rating of "80kg" for a system like the F38, it refers to Vertical Static Load (stationary weight). In the real world, you deal with Dynamic Payload. When running with a gimbal, G-forces can effectively triple the weight of your camera. For heavy cinema rigs exceeding 3kg, we recommend moving to the F38 Anti-Deflection versions or the heavy-duty F50 system to ensure long-term mechanical reliability.
Environmental Stability: The Wind Load Tipping Point
High mounting density often increases the "surface area" for the wind to catch. If you mount a large monitor high above your tripod’s center of gravity, you are effectively creating a sail.
Modeling Stability
We simulated a 3.2kg rig on a 1.5kg carbon fiber tripod. Our calculation method: We defined the "Tipping Point" as the moment where the Wind Overturning Moment ($Force \times Height$) exceeds the Tripod Stability Moment ($System Weight \times Tripod Base Radius$).
Under these conditions, we calculated a critical wind speed of 17.35 m/s (approx. 38 mph). To mitigate this, place your heaviest components at the lowest possible QR point and consider using a ballast as suggested by ASCE 7 wind load standards.
The "Thermal Bridge" and Winter Operations
Aluminum is a highly efficient thermal conductor. In extreme cold, QR plates can act as a "thermal bridge," pulling heat away from the camera body and battery.
To maximize battery life in sub-zero conditions, we recommend attaching your aluminum QR plates to the camera indoors at room temperature. This minimizes the "thermal shock" and slows the rate of battery cooling. This practice, combined with following FAA cargo safety resources, helps gear remain operational in harsh environments.
Practical Implementation: The Pre-Shoot Safety Checklist
High-density systems are only as effective as their operation. To minimize the risk of a dropped camera, we advocate for a strict three-step tactile workflow:
- Audible: Listen for the distinct "Click" of the spring-loaded pin.
- Tactile: Perform the "Tug Test." Pull the camera firmly in the direction of release to ensure the lock is seated.
- Visual: Check the locking indicator. Ensure the status pin is in the manufacturer-specified "locked" position.
Cable Management and Torque
A stiff HDMI cable can exert enough torsional stress on a small QR plate to cause subtle wobble. We suggest using dedicated cable clamps (like those in the F22 ecosystem) to provide strain relief.
Strategic Infrastructure for the Future
Deciding on mounting density is not about how many accessories you can fit; it is about how many you need to move. By focusing on the 20% of mounting points that handle 80% of your transitions, you create a rig that is fast, safe, and ergonomically sound.
Whether you are optimizing for the biomechanical limits of your wrist or the economic ROI of your shoot day, the goal remains the same: a reliable infrastructure that disappears so you can focus on the frame.
Appendix: Modeling Assumptions & Reproducible Parameters
The quantitative insights in this article are derived from scenario modeling based on the following parameters. These are intended as practical heuristics, not universal guarantees.
| Parameter | Value | Unit | Rationale |
|---|---|---|---|
| Rig Mass (Documentary) | 2.8 | kg | Full-frame body + Cinema lens + Cage |
| Swaps per Shoot | 25 | count | Based on internal workflow observations |
| Hourly Labor Rate | 75 | USD | Mid-tier professional creator rate |
| MVC Limit (Wrist) | 10.5 | N·m | Derived from ergonomic grip studies |
| Wind Drag Coeff (Rig) | 1.3 | - | Estimated for irregular shape with matte box |
| Critical Wind Velocity | 17.35 | m/s | Calculated tipping point for 1.5kg tripod |
Boundary Conditions:
- ROI calculations assume saved time is reallocated to billable tasks.
- Torque models assume a horizontal lever arm position (worst-case scenario).
- Stability models assume steady-state wind and level ground.
Disclaimer: This article is for informational purposes only. Mechanical rigging involves inherent risks. Always consult manufacturer specifications and perform safety checks before operating complex camera systems.


