A modular studio rig works best when you start with one shared base that keeps the camera quick to attach, then add lighting and audio only where they solve a real placement problem. For most creators, that means treating the base plate as the foundation of the build, not the accessory pile. A clean camera light mic mount setup is easier to adjust, easier to reconfigure, and less likely to turn into desk clutter.

Start With the Base Platform
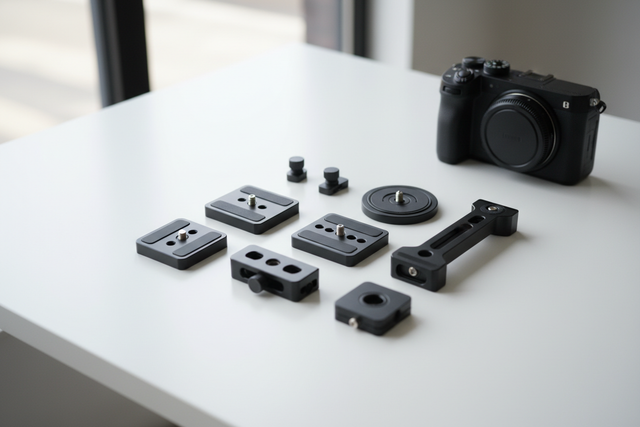
The first decision is simple: choose a base that standardizes how the camera attaches before you think about lights or audio. That matters because the whole modular studio rig depends on one stable interface, and the ISO 1222:2010 tripod connections standard defines the thread sizes that make cross-brand mounting possible. In practical terms, the base is what lets a studio setup quick release system stay organized instead of becoming a collection of mismatched parts.
That also explains why a consolidated rig can be a better fit than scattering separate stands across a desk. Independent coverage of an all-in-one creator stand shows the basic appeal clearly: one central support can hold more of the setup in one place, which clears room for other tasks on the desk and keeps the camera zone simpler to manage. For a small studio, that is usually the real win, not just a nicer-looking setup. Falcam GearTree all-in-one stand coverage gives a useful example of that consolidation logic.

A good starting rule is this: if the camera is the piece you remove, reposition, or swap most often, build around the quick-release base first. If the base is wrong, every later add-on feels harder than it should. If the base is right, the rest of the rig becomes a matter of adding only what the shot actually needs. For creators standardizing their kit, one quick-release system is the cleaner path because it reduces mismatch friction as the rig grows.
Map Camera, Light, and Mic Mounts
Once the base is set, the next step is to decide what each accessory should do. A cold shoe modular mount is usually the cleanest way to add a compact light or microphone close to the camera when you want a tighter, simpler rig. That works well when the goal is to keep the accessory near the frame without dedicating an extra stand to it.
A magic arm fills a different role. It gives you more placement freedom when the light or mic needs to sit off to the side, rise above the camera, or clear part of the frame. In a small desk studio, that extra reach is useful when the camera stays centered but the mic or light needs to move around it. The tradeoff is obvious: the arm adds another joint, so it should solve a position problem rather than be used just because it is available.
A clamp helps when the rig has fewer open mounting points than the creator expected. It can turn a desk edge, stand tube, or other solid surface into a usable attachment point, which is useful in a compact studio where threads are already spoken for. That said, the clamp is only helpful if the surface shape and thickness make sense for it. If the clamp cannot sit securely, the accessory it carries will feel awkward no matter how good the rest of the rig is.
This is where fit checks matter more than enthusiasm. When you stack a mic and light onto the same platform, the real question is not whether the parts look compatible in photos. It is whether the interface, clearance, and access all still work once the rig is assembled. A technical reliability review of F38-style setups warns that creators should check fit before stacking accessories, because small alignment problems can create play or rotational sag in real use. That is why the safest modular camera rig with lights and mic is the one that stays compact without crowding the controls or blocking the frame.
If you are still choosing where to start, use the base first, then add the accessory that fixes the current bottleneck. A mount designed to reduce deflection is the kind of add-on that makes sense when the platform itself needs to stay stable as the rig grows. For angle control, an articulating magic arm is the better choice when reach and placement matter more than minimalism. And when you need a spare anchor point, a super clamp can solve the "where do I attach this?" problem without rebuilding the whole desk.
Choose the Right Layout for Your Setup
The best layout depends on how often each piece moves and how much clutter you can tolerate. This is the simplest way to compare common modular studio rig setups:
| Layout | Best When | Main Trade-Off | Avoid When |
|---|---|---|---|
| Camera-first | You want the fastest camera swap and the cleanest desk footprint | Limited room for accessories unless you add them carefully | The mic and light need frequent repositioning |
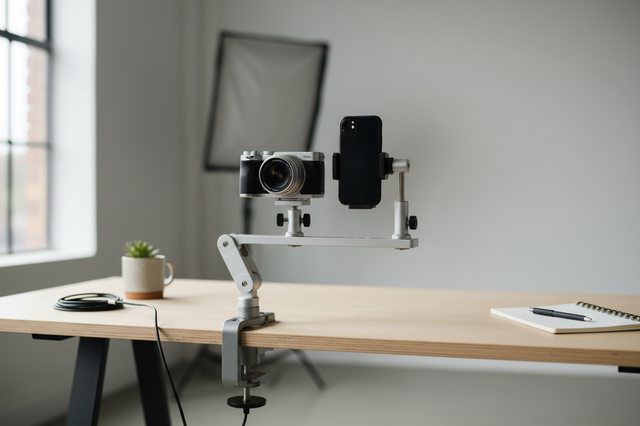
| Balanced camera + audio | The camera stays centered and the mic needs a practical, fixed place | More parts than a camera-only build, but still manageable | You need constant angle changes from multiple accessories |
| Fully expanded camera-light-mic | You want one platform to handle most of the studio duties | More joints, more clearance checks, and more visual clutter | Your desk setup has very low clutter tolerance |
A camera-first layout is the safest starting point for a tight desk or a creator who repositions gear often. A balanced layout makes sense when the mic is part of the regular workflow but does not need to move every time you change the shot. A fully expanded layout is best when the rig is expected to do most of the work, and you are comfortable with the extra interfaces that come with that flexibility.
That tradeoff is why a modular setup is not always the best answer. If your studio is supposed to stay low-profile and set-and-forget, separate mounts or a simpler fixed layout may be the better choice. If you want faster reconfiguration between recording, streaming, and editing, the modular approach usually wins because it gives you a cleaner way to change one part without rebuilding everything else.
If you are deciding between F22, F38, and F50 paths, the useful question is not which one sounds strongest. It is which one matches your workflow size and how much expansion you actually plan to do. The Falcam system fit guide is a useful follow-up when you want to compare the standard before you buy.
Build for Speed, Stability, and Cleanup
Before you call the rig production-ready, run a quick check in the same position where you will actually use it. First, confirm that the base is secure and does not shift when you touch the camera. That matters because secure mounting points are what keep the whole setup predictable during a shoot, especially once multiple accessories share the same support. The SMPTE camera mounting connection standard is a useful authority for the idea that mounting points should stay dependable under real production use.
Second, place the microphone so it stays out of the frame and does not block camera controls. Third, place the light so it does not create glare, reflections, or a new shadow problem. The point is not to make the rig look busy; it is to make it work in the real recording position.
Fourth, route cables so they do not pull sideways on the mount or snag when you adjust the setup. In forum discussions about modular desk rigs, heavy cables are a common source of leverage and drift, so cable strain relief is part of stability. Fifth, test how fast you can move the rig back into recording position after a change. If a part only adds clutter and does not improve the shot, remove it.
That is the right end state for a modular studio rig: one base, only the accessories you actually use, and a layout that still feels tidy after a few setup changes. If your build reaches that point, you are ready to expand with purpose rather than collect parts. We make it easier to browse the next step by starting with the base platform, then adding the accessory that solves your bottleneck, then moving into the broader creator-accessory range.
What to Buy Next for a Cleaner Rig
Once the first build works, add the next piece only when it removes a real bottleneck. If the camera swaps too slowly, another quick-release plate may help more than a new arm. If the mic is still crowding the frame, a better mounting position may matter more than a brighter light. If the desk feels busy, stop adding parts and keep the rig as simple as it can be while still doing the job.
The cleanest upgrade path is usually the one that fixes the most annoying problem first. That might mean one more plate, one stronger clamp point, or one accessory arm that lets you place a light or mic without rebuilding the entire setup. It does not mean buying every option at once. A modular rig stays useful when each new part has a clear job.
For readers who want the next step, the one quick-release system, F22 vs F38 vs F50 comparison, and camera accessories collection are the most direct follow-ups.
Final Takeaway
Build the rig in layers: start with the base, add one accessory only when it solves a real placement need, and keep the layout simple enough to reconfigure quickly. That approach gives you a cleaner modular studio rig without turning the desk into a pile of clamps and joints. Compare the base platform first, then browse the camera accessories that match your current bottleneck, and only add the next piece when it improves the shot or the workflow.
FAQs
How Do You Mount a Light and Mic on One Rig?
Start with a shared quick-release base, then add the light or mic one at a time so you can check clearance after each step. The cleaner approach is usually camera first, then one accessory, then the second only if the frame still stays open and the cables do not pull on the mount.
What Should You Prioritize First in a Modular Studio Rig?
Prioritize the base platform before you buy extra arms or clamps. If the camera attachment is not stable and quick to swap, every later accessory becomes harder to manage. A good rule is to solve the camera mount first, then add only the piece that fixes the next real bottleneck.
Why Use a Cold-Shoe Modular Mount Instead of Separate Stands?
Use a cold-shoe modular mount when you want compact gear close to the camera and you do not need much distance from the lens. Separate stands make more sense when the light or mic needs isolation, wider placement, or more room than the camera-side mount can comfortably provide.
Can a Magic Arm Improve a Small Studio Desk Setup?
Yes, if you need more placement freedom than a fixed mount can give you. A magic arm helps when the mic or light has to move around the frame, sit off to one side, or clear a crowded desk surface. It is less useful if your setup never changes position.
What Should You Check Before Expanding an F38-Based Rig?
Check the interface fit, available clearance, and cable path before adding more parts. The main failure mode is not that the rig cannot grow, it is that the extra pieces crowd each other or create drift if they are stacked without a plan. If you can still adjust the camera cleanly after adding the new part, the expansion is probably sensible.