To make clip-on phone lighting look softer in a close-up, start with a short test. Record the shot, move the light a little off the camera axis, record again, and keep whichever clip looks better.
Moving the light changes where shadows and highlights fall. It does not make the light itself softer. For that, you need diffusion that is made for your exact light, and the close-up still has to be bright enough after you add it.
Start With a Short Off-Axis Test
Change only the light's position first, then compare two recordings side by side. A clip-on light sits right next to the lens, so it lights the subject straight on. Shifting it a little to one side is an easy change to undo, and the footage shows you whether it helped.
- Record a baseline clip. Leave the light where it is now. Frame the close-up exactly the way you plan to shoot it, then record a few seconds.
- Lock everything else. Keep the framing, distance, and any room lights as close to the same as you can, and leave the light's brightness setting alone. If you change several things at once, you can't tell which change made the difference.
- Move the light modestly off-axis. Shift it a short way to the left or right of the lens, or slightly above it. If the light is clipped to the phone and can be mounted on its own, holding it by hand or setting it on one of our compact light stands makes it easier to place it away from the lens.
- Record a second clip. Use the same framing and the same few seconds of action.
- Compare the clips on a larger screen if you can. Look at where shadows land around the nose, under the chin, or along the edges of a small product. Then check whether the highlights look smaller, larger, or more even.
- Keep or undo. If the new clip suits the shot better, keep that position. If it doesn't, go back to where you started.
Both clips should be steady and correctly exposed. Smartphone video guidance from NC State recommends stable, steady lighting. It also warns that pointing the camera straight at bright light sources can cause overexposed footage and lens flare. If either test clip shows flare or blown-out areas, fix that before you compare the lighting.
No single angle works for every face, product, or room. Let the footage decide, and try a second small shift if the first one isn't quite right.
Off-Axis Changes the Look, Not the Source
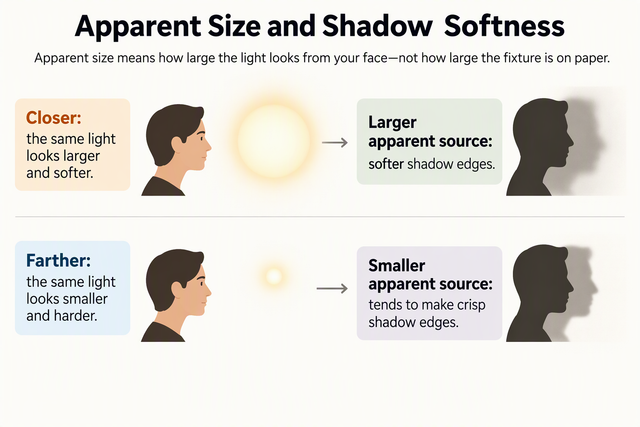
Moving the light changes the shadow pattern, but it does not change how soft the light is. These are two separate controls, and mixing them up leads to the wrong fix.
A university guide to studio lighting basics from Rice University lists three things to consider: the size of the light source, its intensity, and its position. It explains that the larger the light source, the softer the light, which means shadow edges look less sharp. The guide's position examples come from studio portraits. Raising a soft box opens up the shadows, while placing it at an angle creates deeper ones. The light is the same size in both shots. Only the shadow pattern changes.
A clip-on light follows the same rule. When you slide it off-axis, it stays the same small source. What changes is the direction the light comes from. A face lit straight on can look flat because the shadows fall behind the subject, out of view. Light from the side puts some shadow back on the face and adds shape. That can make the close-up look less harsh, but the shadow edges are still coming from a small light.
So judge your comparison clips for what moving the light actually changes:
- Placement: Did shadows move to a spot that flatters the subject, or onto the eyes?
- Depth: Does the face or product look more three-dimensional, or now too contrasty?
- Edge quality: If the shadow edges still look crisp and you want them softer, moving the light alone won't fix it. That is a job for the source, which the next section covers.
Use Diffusion Only When Fit and Brightness Hold
Add diffusion only when it is made for your exact light, and keep it only if the recorded close-up stays bright enough. Diffusion alters edge quality—the trait repositioning cannot change—but the Rice guide notes that any diffusive material also decreases light intensity. A softer close-up that ends up too dark does not help the shot.
Work through it in this order:
- Confirm the fit for your exact model. Look in the manual or the product listing for your light for a diffuser or diffusion setup made for it. A cover that looks the right size isn't proof that it fits. Don't tape, wrap, or improvise an attachment the light wasn't designed for. If you can't confirm a supported option, skip diffusion and rely on the positioning test.
- Record the real close-up. Attach the supported diffusion, then record at the framing and distance you plan to use. Leave everything else the same as your best clip from the positioning test.
- Check brightness in the footage. Does the subject still look properly lit, or has the image turned dim or grainy? Judge it by what your shot needs. No single number works for every scene.
- Decide. If the clip looks softer and still bright enough, keep the diffusion. If it's too dim, remove the diffusion and go back to your last setup that worked.

For a deeper look at how diffusers change a light's spread and shadow lines, our guide to diffuser physics for small lights explains the mechanics in more detail.
Whichever path you end up on, the recordings make the decision. Keep the setup from the clip that looks right for your close-up and is still bright enough to use.

FAQs
Will a larger light look softer than a clip-on light?
Generally, yes. According to the Rice guide cited above, a larger light source gives softer light, with less sharply defined shadows. A small clip-on light can't match that on its own. If your close-ups regularly need softer shadows than diffusion can give you without too much light loss, a larger source from our video lighting range is one option to consider. Larger panels also give you room for setups like the diffuser choices covered in our guide to portable lights for beauty portfolios.
Does stacking more diffusion layers keep helping?
Each layer costs you brightness. Adobe's overview of diffused light photography explains that diffusion works by placing translucent material between the light and the subject. It also notes that with each added layer, less light gets through. Add layers only when your light supports them, and stop at the point where the close-up starts to look too dim.
Can a second light help with close-up shadows?
It can. A second light on the opposite side lets you lift the shadows the first light creates, so you can keep some shape without deep, dark patches. This means you're setting up two lights instead of one. Our walkthrough on two-point interview lighting shows how a side key light and an opposite fill light work together, and you can scale that idea down for tabletop or face close-ups.
Does the same approach work for small products, not just faces?
Yes. Watch the reflections and highlights on glossy surfaces, as well as the shadows along edges and surface textures. Compare the test clips and keep the setup that shows the product the way you want.