

Harsh midday light can give photographs strong shapes, deep shadows and clear color relationships. The challenge is choosing subjects and camera positions that make those qualities useful. Start with a simple scene, watch where the shadows fall, protect important highlight detail and let some darkness remain in the finished image. You can make compelling photographs between sunrise and sunset without trying to turn every location into a golden-hour scene.
Sean Dalton's photography walk through Lisbon offers a practical starting point for this approach. The most useful lesson is to work with the light you have: simplify a busy composition, move to change the direction of illumination, or step into shade when a face needs softer light. Those decisions matter before you reach for a preset or add more equipment.
Choose Simple Scenes Before Changing Settings
In direct sun, every small branch, leaf and uneven surface can create another bright spot or dark patch. A scene that feels peaceful in person may become difficult to read as a photograph. Before changing exposure, ask whether the frame contains too many competing shapes. If the answer is yes, a different subject or tighter composition may solve more than a settings adjustment.
Look for a wall, a clear stretch of pavement, a simple building facade or an open area with a readable horizon. Large shapes give the viewer a place to rest. Negative space can be bright or dark; its value is that it leaves your main subject clearly separated from the surrounding detail. A plain wall with one diagonal shadow often offers a stronger starting point than a whole square filled with scattered highlights.

Use the edges of your frame as a practical test. Check for bright fragments, clipped signs and unrelated objects that pull attention away from the subject. Move closer, change your height or narrow the view until the main shape becomes obvious. The aim is not to remove every detail, but to give the remaining details a clear relationship.
A longer lens can help isolate a clean portion of a complicated location. It does not soften sunlight; it changes what you include. If the available view remains cluttered, try another direction rather than forcing the same composition. Open sky can also provide negative space, provided you check how your new position changes the light on the subject. For steady handheld shooting, keep the camera close to your body and settle your stance before releasing the shutter.
Change Your Position to Control the Shadows
Light direction determines which parts of a subject look bright and where its shadows appear. The same location can produce a flat-looking photograph, a silhouette or a textured image depending on where you stand. Understanding hard and soft light gives you a useful vocabulary, but the fastest field exercise is to walk around one subject and compare the results.
With front light, the sun is behind the photographer and lights the subject from the camera side. Much of the visible surface receives light, while the main shadow may fall behind it. This can make a shape easy to recognize, although it may reveal less depth than a composition with visible side shadows. Decide whether clear color or dimensional texture matters more for that particular image.
With backlight, the light source is behind the subject relative to the camera. The face or front surface may become dark while an edge catches light. This can separate the subject from the background, but it can also create a large difference between bright surroundings and the shaded subject. Choose whether you want a silhouette or readable detail before deciding how to expose.

Side light makes the relationship between illuminated surfaces and shadows more visible. On architecture it can reveal planes and recesses; on a person it can give the face more shape. Move a few steps and watch the shadow boundary instead of judging only the subject's brightness. A small change in position can create a clearer composition without changing any camera setting.
No direction wins every time. Front light may suit a graphic color study, backlight may suit a silhouette and side light may suit texture. Make the choice from the image you want, rather than treating one direction as a rule that every photograph must follow.
Expose for Important Highlights
Bright walls, pale paving and sunlit clothing can sit beside very dark shadows. Your first exposure decision is which bright areas need to retain texture. A white facade that carries the composition deserves attention; a small glint may be less important. This distinction helps you protect useful information without treating every bright pixel as a reason to darken the whole photograph.
Dalton describes starting around half a stop to one stop below the meter's suggested exposure in harsh light. Treat that as a starting point from his practice, then check your own frame. Different subjects, metering choices and lighting conditions can require different adjustments. A negative meter reading alone does not establish that the highlight detail you care about has been preserved.
A histogram shows the distribution of tones, with darker values toward the left and brighter values toward the right. Check whether important highlights are pressed against the right edge, then compare that information with the actual image. The graph helps you assess exposure, but the photograph tells you which areas matter. A deliberately dark composition does not need a perfectly centered histogram.
If useful highlight texture is disappearing, reduce exposure and check again. At the same time, consider whether the subject becomes too dark for the result you want. When both ends of the scene cannot be held comfortably, a change of angle, a simpler background or a move into shade may be a better solution than a larger exposure adjustment.
RAW capture leaves room to shape tone during editing, but that flexibility does not make every exposure recoverable. Keep an eye on the important bright surfaces while shooting. Later, raise shadows only as far as the photograph needs. Protecting detail at capture and choosing a contrasty final rendering are compatible decisions: one preserves options, while the other determines how you use them.
Use Open Shade and Reflected Light for Faces
Direct overhead light can put a person's eyes into deep shadow while the forehead and cheeks remain bright. If that does not suit the portrait, change the lighting situation before asking editing software to repair it. Step into shade and look toward a nearby bright, neutral surface that can reflect light back onto the face.
A white building across a street, pale pavement or a light-colored wall can act as part of the environment's lighting. Position the person so the face receives that reflected illumination, then inspect the eyes and the transition into shadow. The useful question is whether the face becomes easier to read, not simply whether the location is technically shaded.

Pay attention to the color of the reflecting surface. A strongly colored wall can cast some of that color onto the subject. A neutral or lightly colored surface is often easier to work with when you want natural-looking skin. Compare positions while you are there rather than assuming that all shade will produce the same color or direction of light.
Time also changes the options. Midday covers a broad portion of the day, and a lower sun can make shadows more directional. The useful change depends on the location and season, so inspect the actual light rather than relying on a fixed afternoon hour. When your schedule is limited, open shade lets you keep working with the conditions already available.
Frame a Subject with a Patch of Sunlight
A narrow alley, doorway or gap between buildings can direct sunlight into a small part of the scene. That patch becomes a natural area of emphasis. Compose around its shape first, then wait for a person or another subject to enter the useful part of the light.
Check the relationship between the subject and its shadow. A bright figure may already stand out, but a clean shadow can add another shape or point through the frame. Leave enough room for both if they work together. If the shadow merges with unrelated dark objects, adjust your position before the subject arrives.

Expose for the lit area that carries the picture and allow the surrounding darkness to provide structure. You do not have to reveal every corner of the alley for the image to make sense. This approach works especially well when the frame has a clear visual hierarchy: one illuminated subject, a readable shadow and a background that supports them.
Keep Your Camera Setup Practical on Location
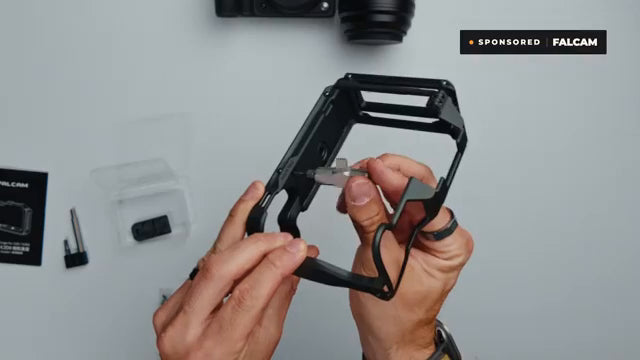
Moving between streets, shade and a tripod position is easier when the camera stays comfortable to operate. For Hasselblad X2D and X2D II users, the FALCAM Camera Cage C00B5901 combines a fitted protective frame with integrated Arca quick-release mounting and a removable L-plate. These features support handling and mounting decisions; exposure and light direction remain photographic choices.
The removable L-plate gives you a choice between a setup ready for supported vertical shooting and a more compact handheld arrangement. In his Lisbon setup, Dalton removes the bracket for the smaller configuration. Think about how you actually carry and mount the camera before making the same choice. Keeping controls and access points usable matters when you need to respond quickly to changing street scenes.

The cage also has a hidden AirTag compartment; the AirTag is purchased separately. A registered AirTag can help you locate an item through Find My when location information is available. This is a useful item-location feature, with a different purpose from the cage's physical protection and mounting functions. Check the relevant setup instructions before relying on it during a trip.
When weighing a cage against a bare body, compare the added structure with the way you shoot and carry the camera. A tripod may help when you want to hold a precise composition, but you can practice these daylight techniques handheld too. Choose the configuration that lets you move deliberately and operate the camera comfortably, rather than adding equipment simply because the sun is bright.
Use Color and Contrast with Restraint
Hard light can make a simple color relationship feel especially clear. Look for a colored chair against a wall, a painted door beside a shadow or two neighboring surfaces with contrasting hues. If a location feels difficult to compose, narrow your attention to those relationships. A small color study can be more successful than a wide photograph that tries to include everything.

During editing, avoid automatically pulling Highlights all the way down and Shadows all the way up. That can remove the tonal separation that made the scene interesting. Start with the main subject, adjust the bright and dark regions gradually, and compare the result with the original. Keep enough shadow to preserve the structure of the composition.
Lightroom Classic's Color Grading panel provides separate controls for the shadows, midtones and highlights. That is useful when you want different color treatment in different tonal regions rather than a single temperature shift across the entire image. Make the broad exposure and contrast decisions first so the color work follows a clear tonal structure.
One option from Dalton's workflow is to warm the highlights and sometimes the midtones, then introduce a cooler complementary tone into the shadows. Use it as a creative direction rather than a required look. Start gently, inspect skin and neutral surfaces, and compare versions. The aim is to strengthen the photograph's color relationships without making every midday image look identical.
A Repeatable Midday Photography Workflow
Choose one short walk and give yourself a specific task at each stop. This keeps the session focused on decisions you can repeat, instead of hoping that brighter conditions will somehow improve on their own. The following sequence brings composition, lighting and editing into the same process.
- Find a simple scene with one main shape, a clean background or useful negative space. Remove distracting bright fragments from the edges.
- Walk around the subject and compare front, side and back lighting. Choose the shadow pattern that supports the picture.
- Check important highlight detail with the image and histogram. Adjust exposure, then reassess the subject rather than relying on one meter value.
- For faces, compare direct light with nearby shade and reflected light. Watch for unwanted color from surrounding walls.
- Wait for a subject to enter a useful patch of light, or make a simpler color study when the wider scene remains cluttered.
- Edit for readable contrast first, then refine color. Compare alternatives before deciding how much shadow detail to reveal.
When reviewing the session, compare photographs made from different positions rather than only checking which one looks brightest. Composition fundamentals such as negative space, leading lines and clear subject placement still apply. Hard light gives you additional shapes to organize; practice is what makes those shapes easier to recognize.
Common Questions About Harsh Midday Light
Q1. Is midday light always bad for photography?
No. It can suit architecture, graphic street scenes, silhouettes and simple color studies. The important choice is whether the subject works with strong shadows and bright surfaces. If a busy location becomes difficult to read, simplify the composition or choose another subject instead of assuming the entire time of day is unusable.
Q2. What exposure compensation should I use in harsh sunlight?
It depends. Dalton often starts around minus half a stop to minus one stop, then checks the result. Use the histogram and important highlight texture to guide your own adjustment. A fixed compensation value cannot account for every subject or metering situation, so reassess after changing your framing or camera position.
Q3. Do I need to recover every shadow in editing?
No. A dark area can provide negative space, separation or a deliberate frame around the subject. Raise shadows when the hidden information helps the photograph, but stop when extra detail weakens the composition. Preserving options in a RAW file does not require displaying all of those options in the finished image.
Q4. How can I photograph people when the sun is overhead?
Use open shade and inspect the reflected light reaching the face. A nearby pale wall or bright building can make the illumination easier to work with, while a strongly colored surface may introduce a cast. Adjust the person's position and background together so the portrait remains readable rather than simply darker.
Q5. Does a longer lens fix harsh light?
No. It can help you exclude distracting objects and isolate a simpler arrangement, but the sunlight remains hard. Combine a tighter view with attention to light direction and background. If the subject still looks awkward, moving yourself or the subject will usually address a different problem than changing focal length.
Q6. Do I need a cage or tripod for midday photography?
No. The core techniques depend on subject choice, position and exposure. A suitable cage can support handling and mounting. If you use a tripod, check the tripod connection before releasing your grip. Use them when those functions match your workflow; neither accessory changes the quality of the sunlight or replaces a strong composition.
Keep the next session simple: find one clean scene, try more than one light direction and make an exposure that preserves the bright details you need. Then edit with the same intention. Midday light becomes easier to use when you choose what to emphasize and let the rest of the frame support that choice.